
A cutting-edge bipedal platform, fully documented.
Developed with advanced control systems and dynamic motion capabilities, the P1 is built to navigate complex terrain, maintain balance and perform a range of human-like movements — a versatile platform for research institutions and industry teams developing and testing bipedal locomotion algorithms in real-world scenarios.
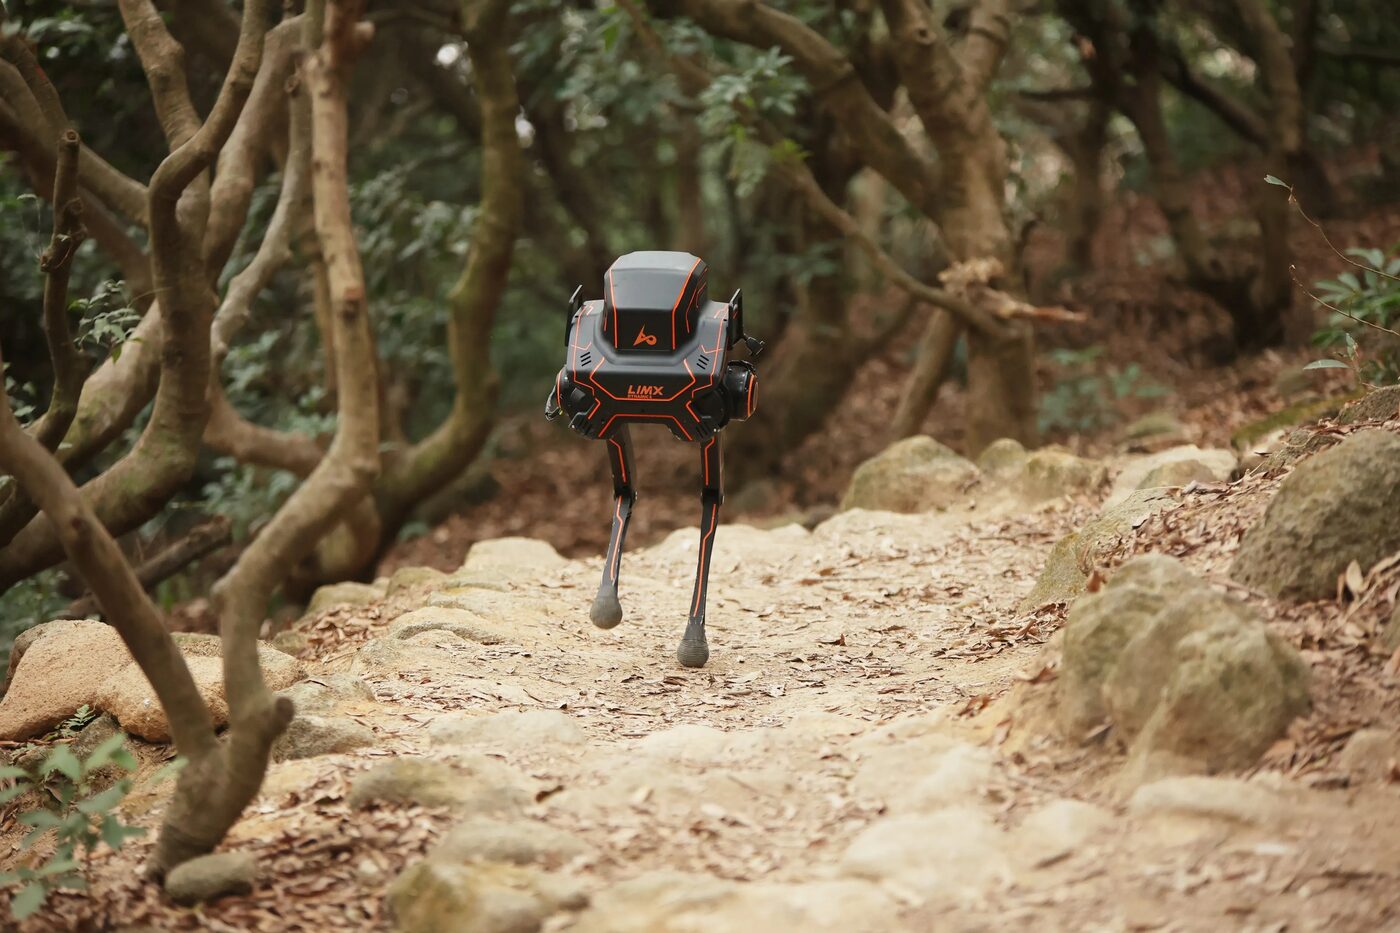
Powering P1
The full power-on / power-off procedure and remote-control startup walkthrough, straight from the P1's own documentation.
Power on
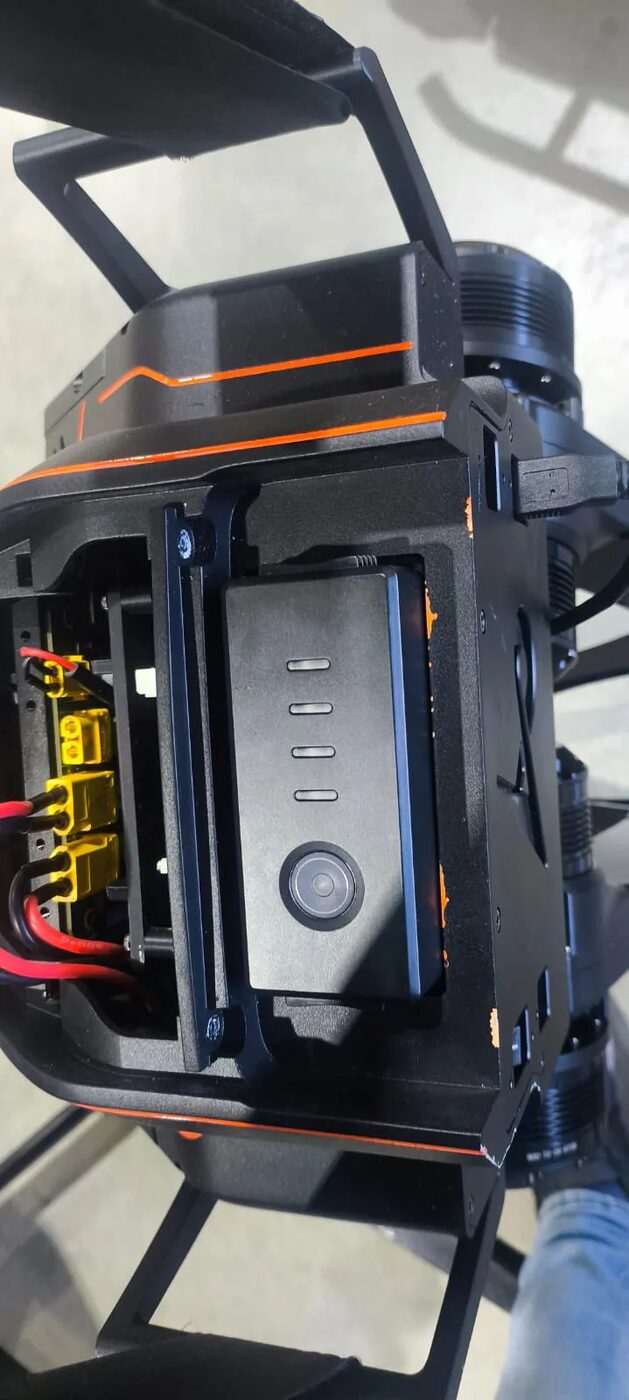
When the robot is off, turn on the battery first by short-pressing then long-pressing the battery button — the battery light turns on. Then turn on the robot switch located at the back of the robot, and wait 30–40 seconds for the robot to complete power-on.
Power off
When the robot is on, first turn off the robot switch at the back of the robot. Then turn off the battery by short-pressing then long-pressing the battery button until the light turns off. Power-off is then complete.
From battery switch to walking
The full remote-control sequence to bring the P1 from a cold power-on to walking mode.
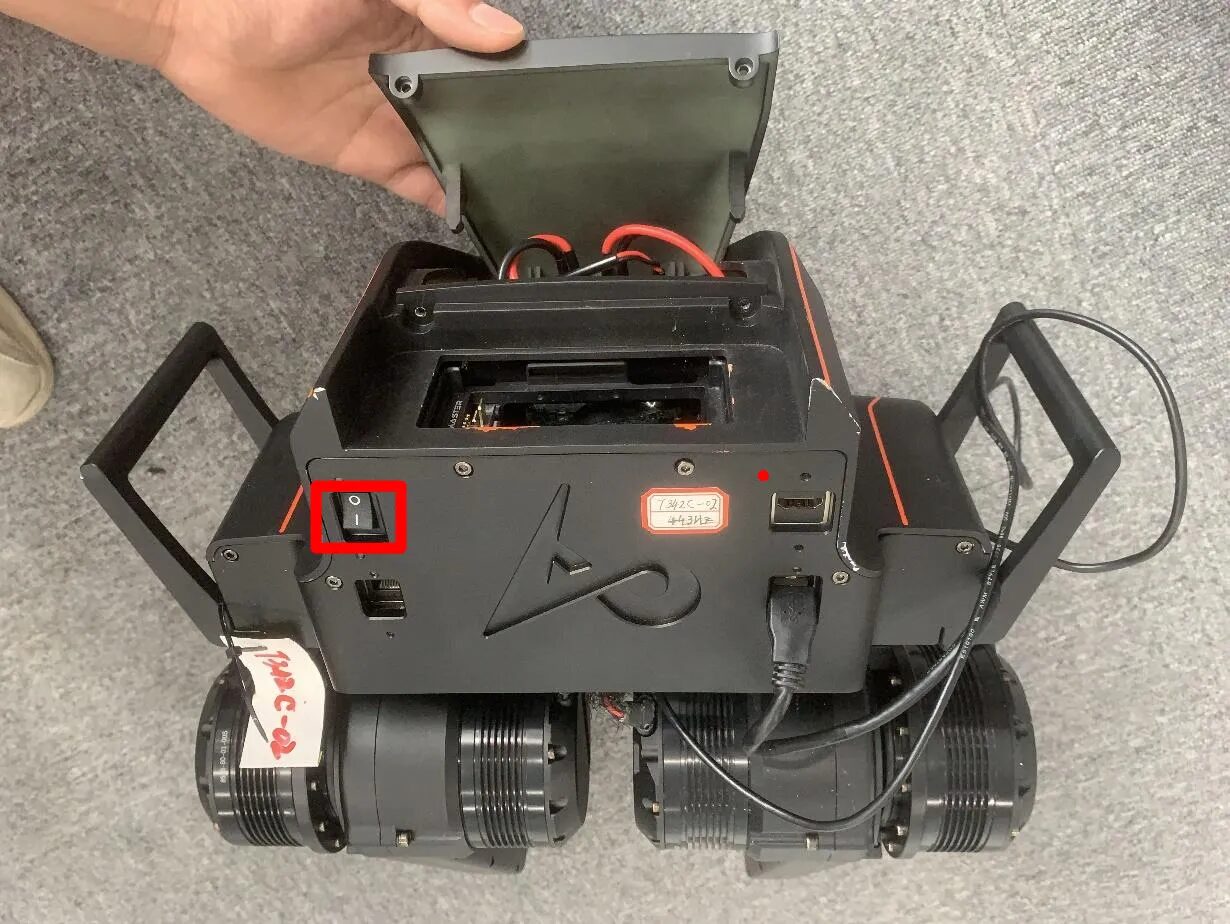
Power up the system
Turn on the battery switch and the switch at the back of the robot, then wait 30–40 seconds after power-up for the system to complete boot.
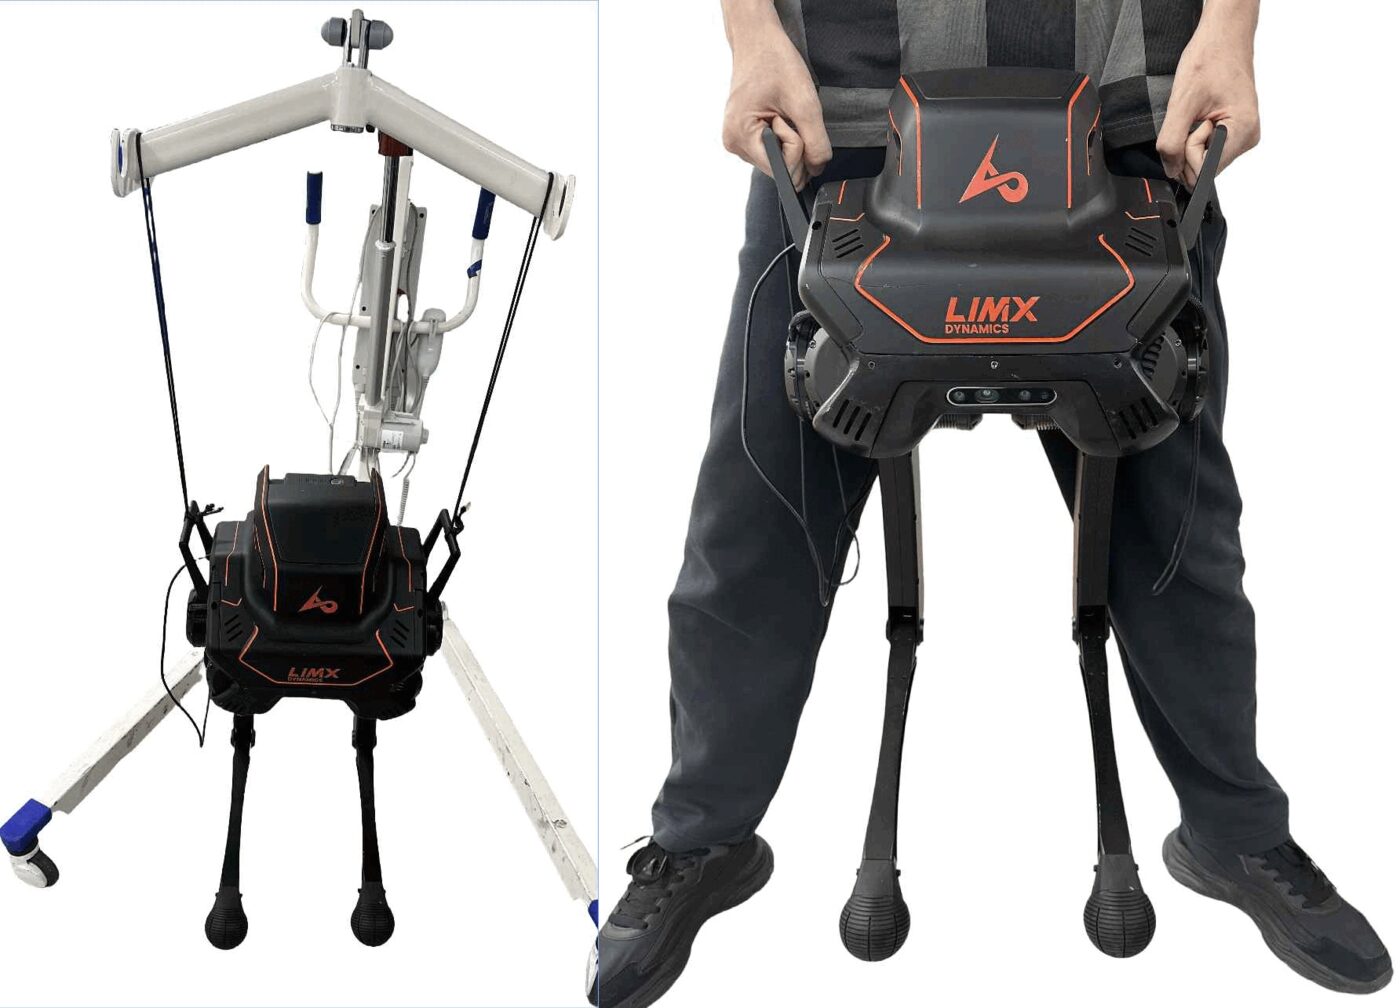
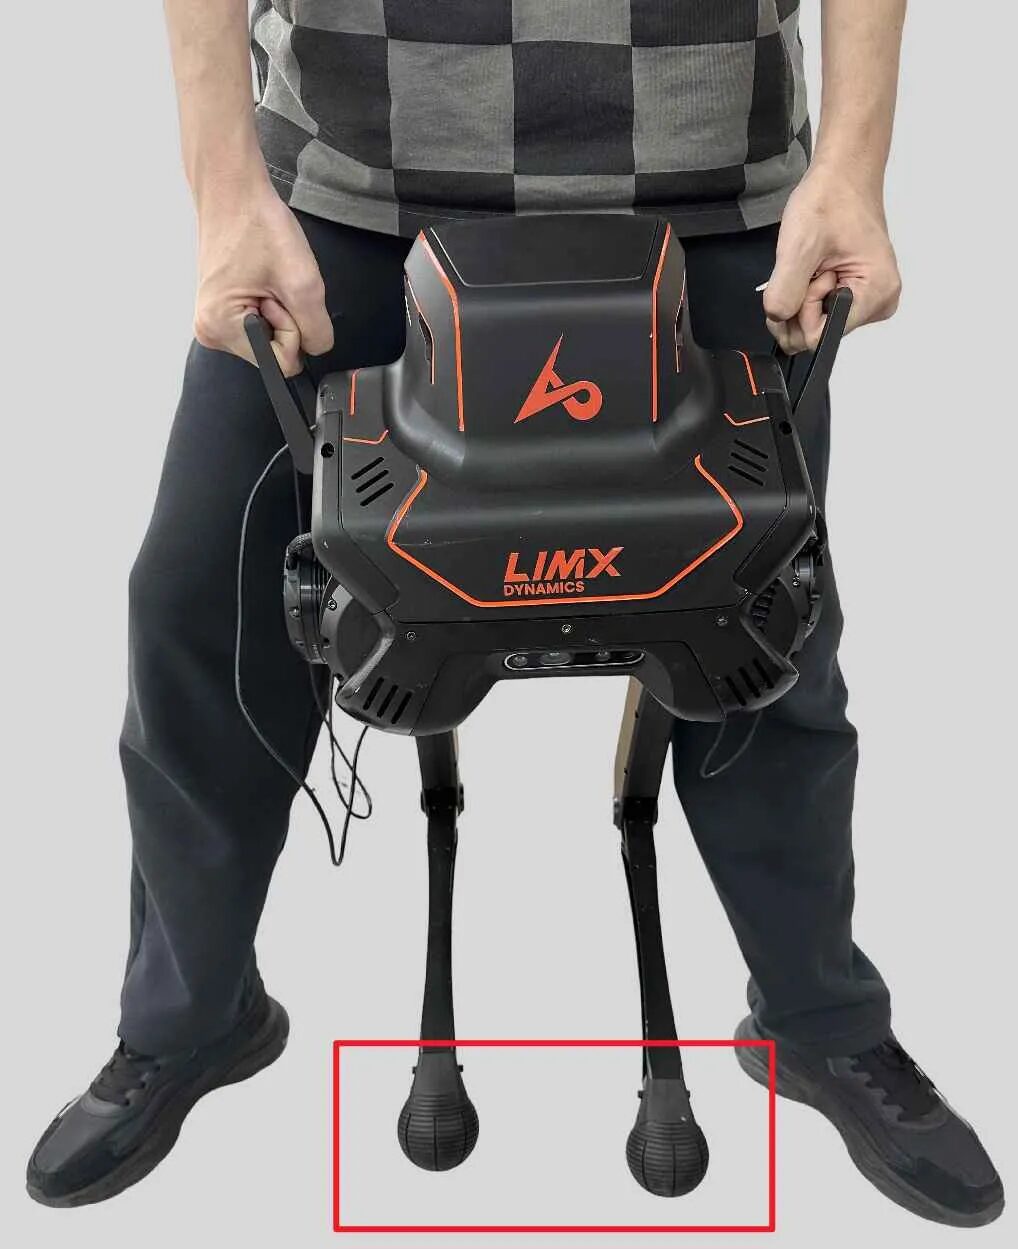
Lift onto its toes
Lift the robot onto its toes, ready for the controls to be activated.
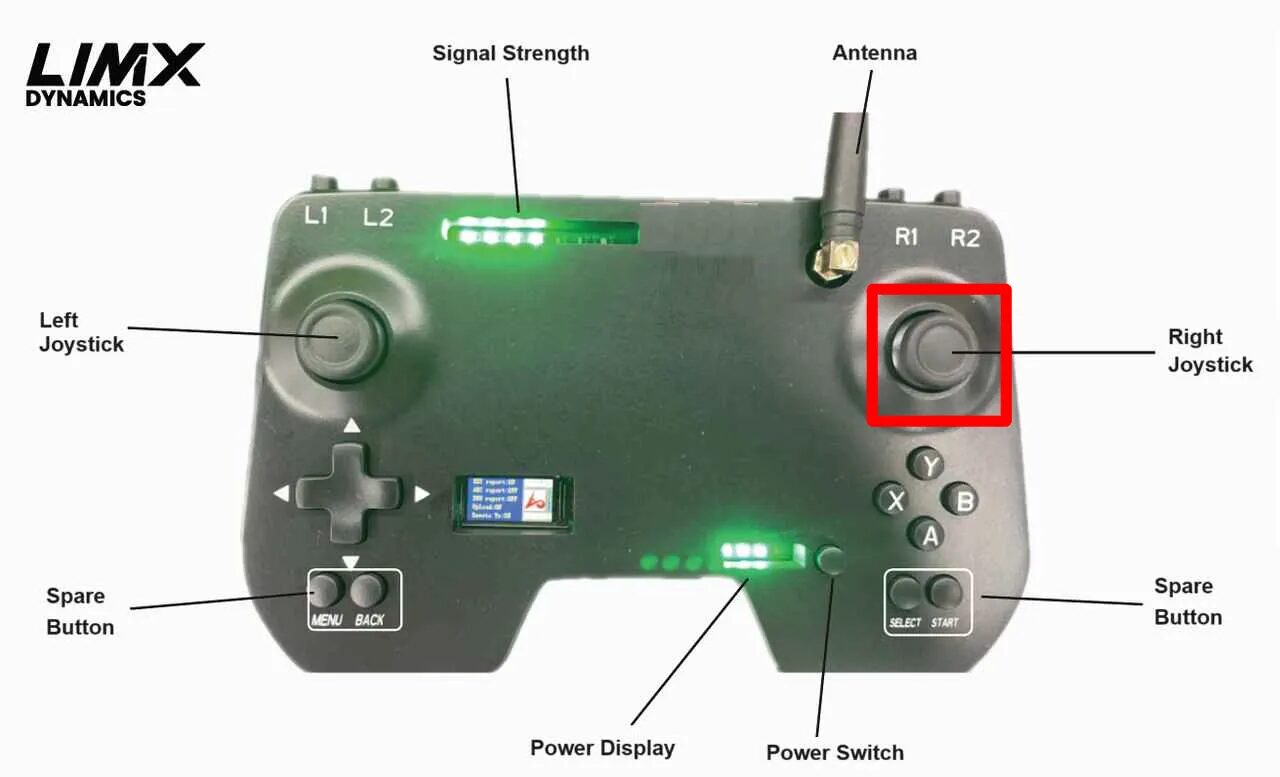
Activate controls
Press the right joystick on the remote control to fully activate the robot's controls.
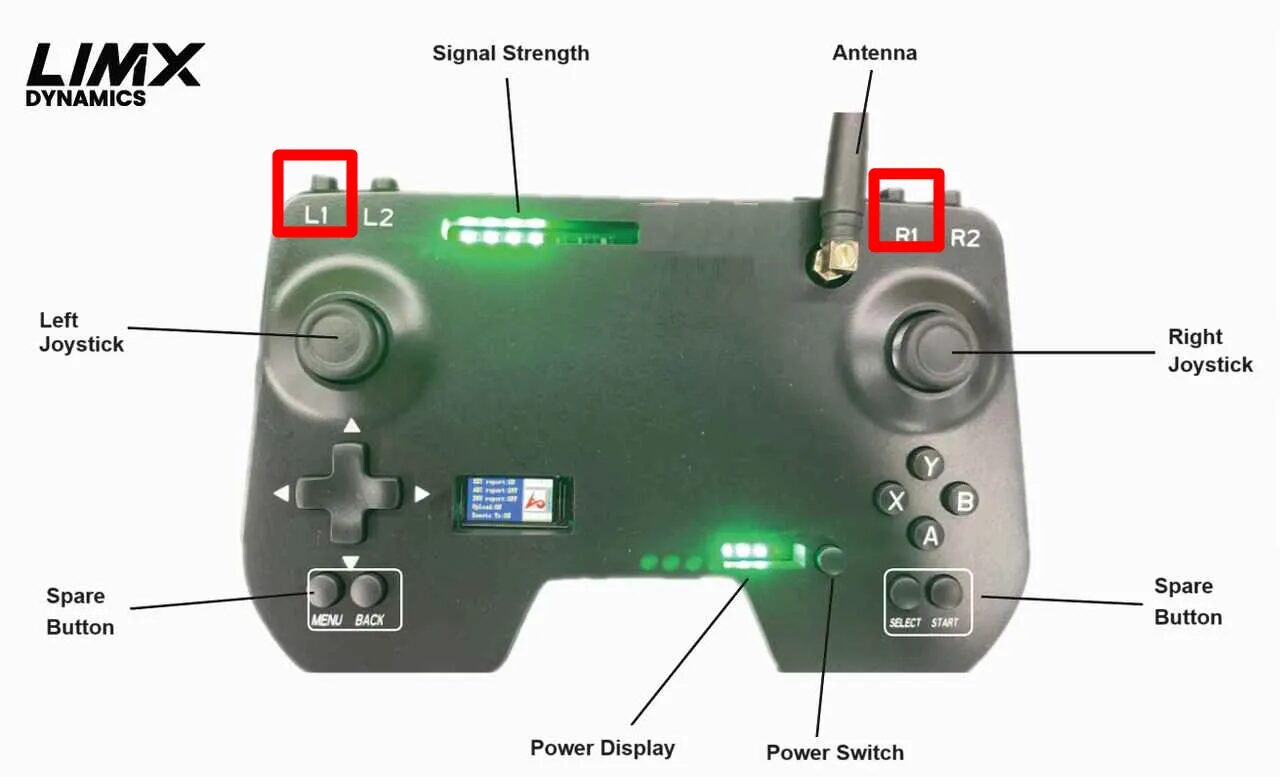
Zero the robot
Use the remote control to zero the robot: press L1 + R1.
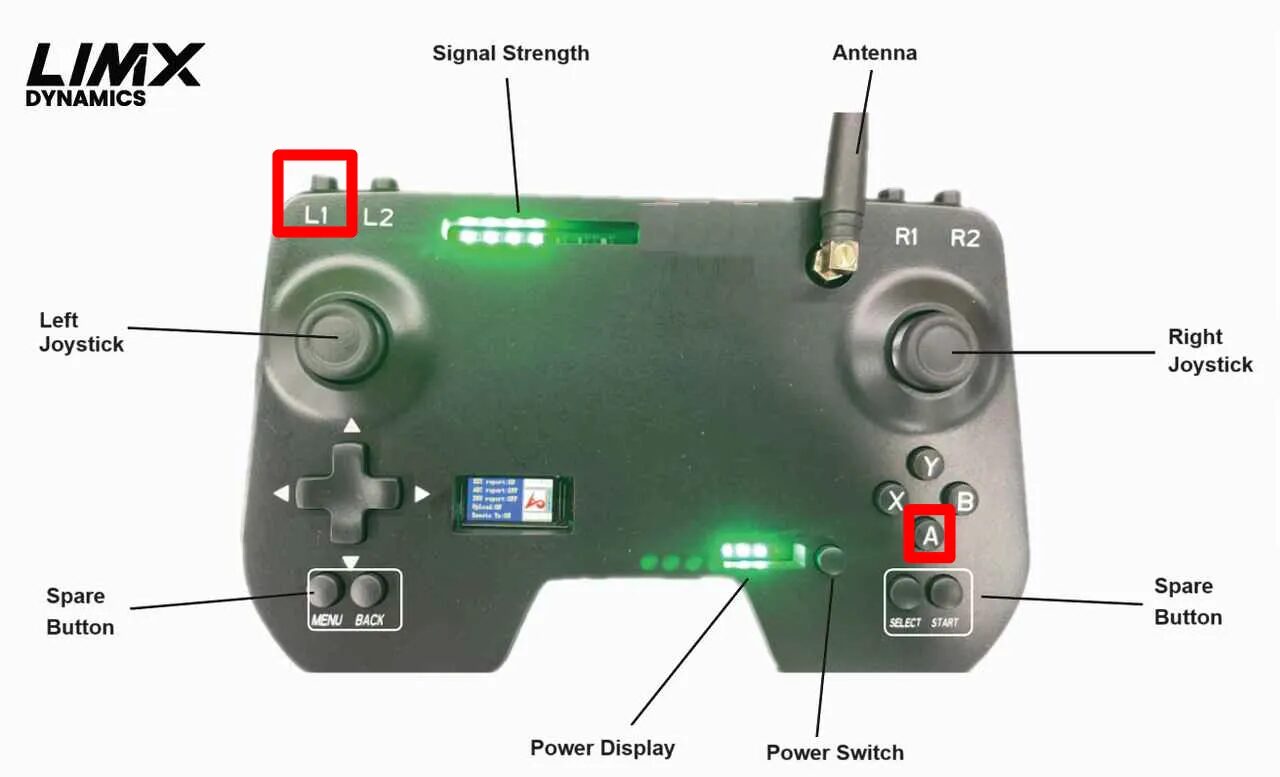
Standing mode
Press L1 + A to put the robot into standing mode — the robot's feet need to be touching the ground.
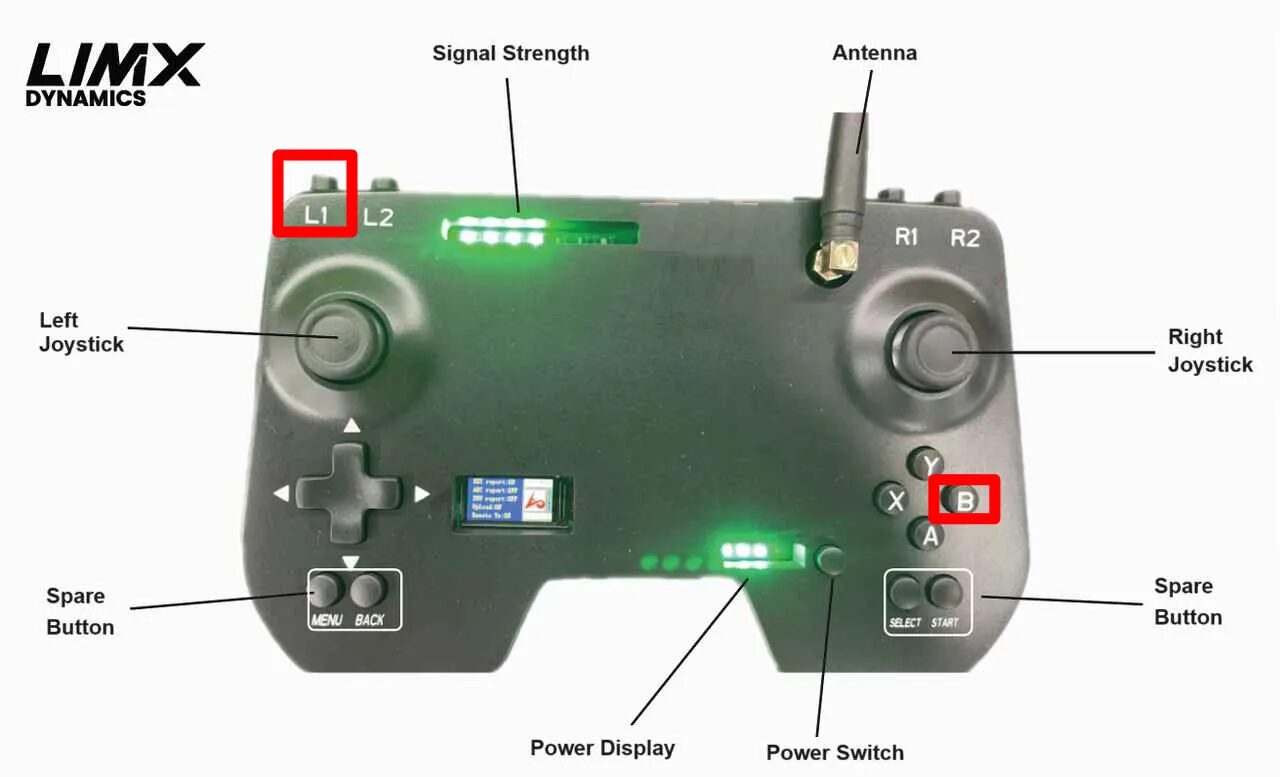
Walking mode
Press L1 + B for walking mode. The right joystick controls forward/sideways walking, the left joystick controls left/right rotation.
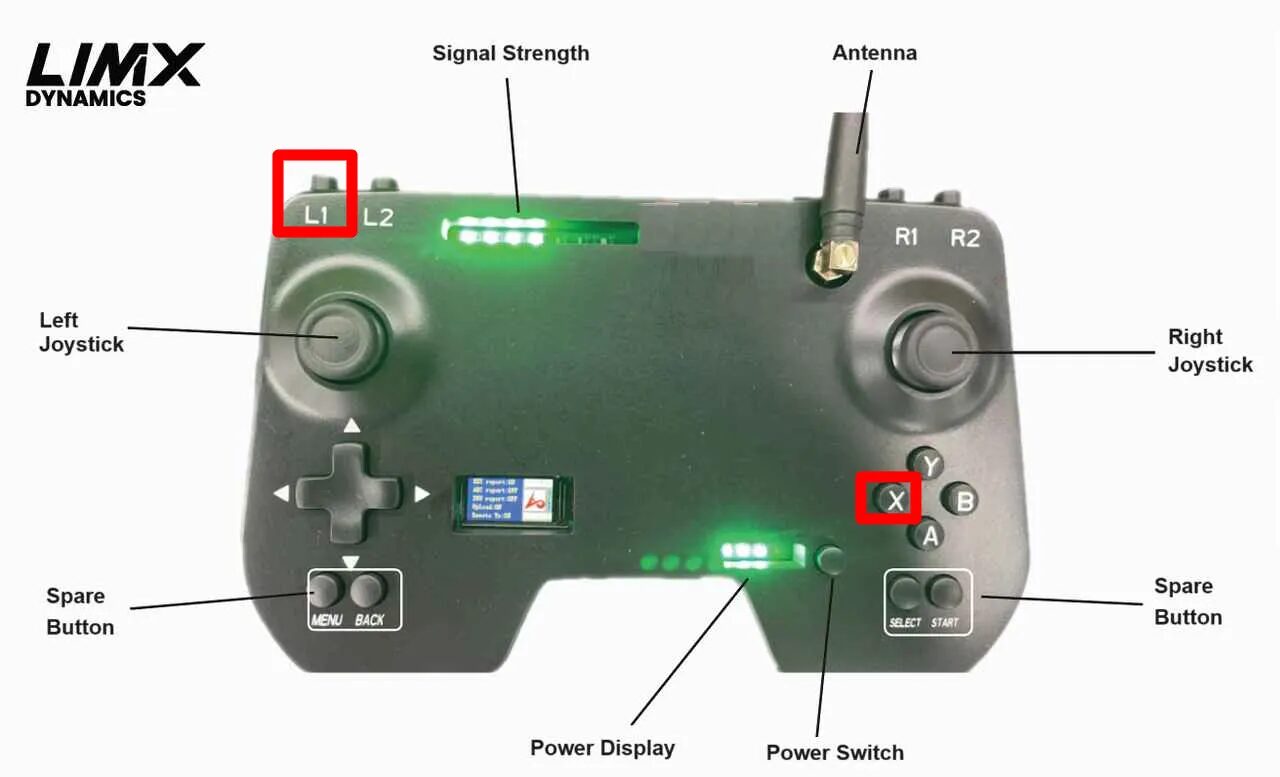
Damping mode
Press L1 + X to enter damping mode — support the toes before entering damping mode.
Power down
Power down the entire system by turning off the switch at the back of the robot.
Full procedure and every callout: MYBOTSHOP LimX P1 User Manual (PDF).
Button & mode reference
The handheld remote is the primary way to operate the P1 — signal and power state at a glance, plus the full state/mode table.
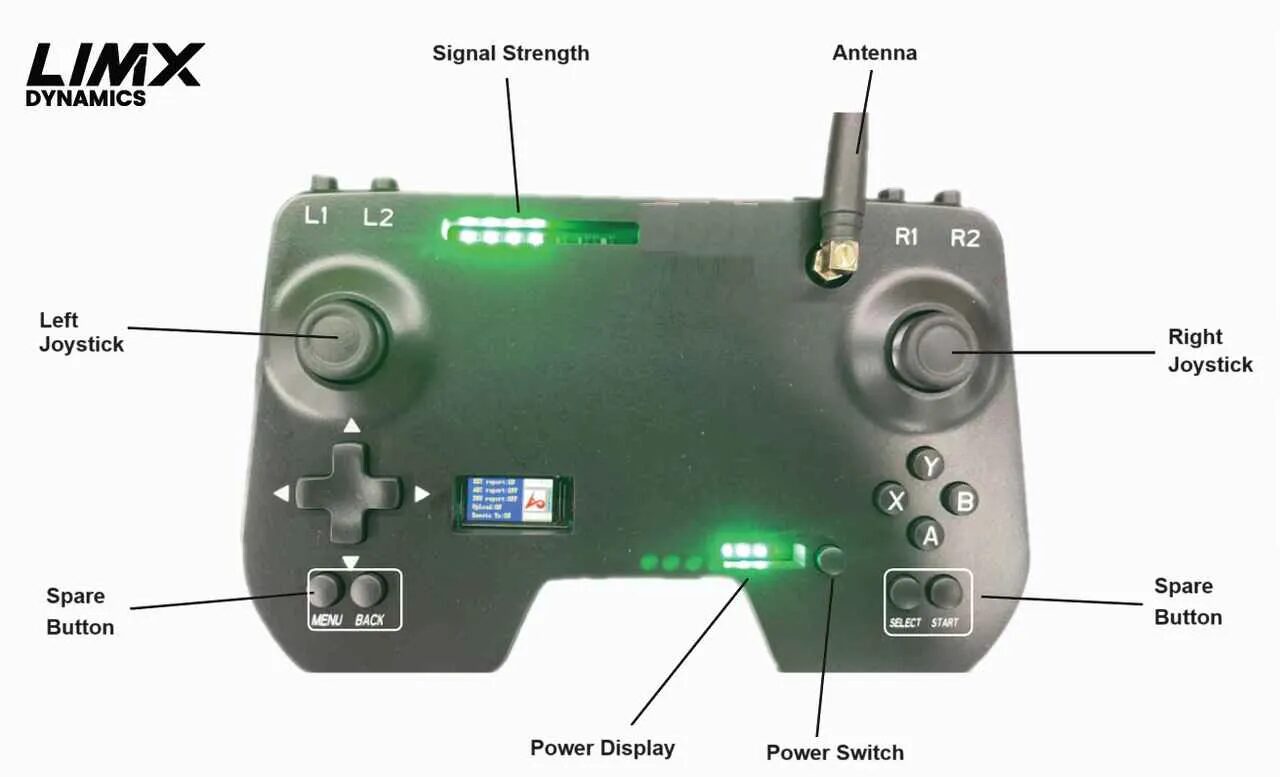
Controls at a glance
| Control | Function |
|---|---|
| Left Joystick | Forward/backward & lateral movement |
| Right Joystick | Direction |
| Power Switch | Single click on, double click off |
| Signal Strength | At least 1 bar needed to control the robot |
| Power Display | 1 bar left → risk of remote losing power |
| Spare Button | Currently no function |
Quick facts
Every mode, its trigger, and its preconditions
| State | Key Value | Description | Preconditions |
|---|---|---|---|
| Auto Zeroing | L1+R1 | Initialize all joints | Robot suspended and off the ground |
| Idle State | L1+X | All joint motors enter torque damping mode and gradually descend; entered automatically after power-on | Robot suspended and off the ground |
| Standing State | L1+A | Both legs autonomously power up and perform ground-contact/stand-up actions | Requires external force assistance; both feet in contact with the ground |
| Walking State | L1+B | Robot enters a stepping state and can be controlled remotely | — |
| Developer State | R1+Left | Users can deploy control and secondary development programs | Main station automatically restarts to take effect after switching |
| Non-Developer State | R1+Right | Mode for RL-model-controlled robot movement | Effective until switching to another mode; main station restarts on switch |
| E-Stop | Left + right joystick buttons | All motors and computers immediately lose power globally; battery power and indicator lights remain on, unit may drop | Press simultaneously; triggers in any mode/state, cuts all motor power immediately |
| E-Release | Right joystick button | Motors power up again | Single click; no effect in other states; enters damping state on release |
Using an external 24V input
The battery power path can be bypassed to run the robot from an external supply.
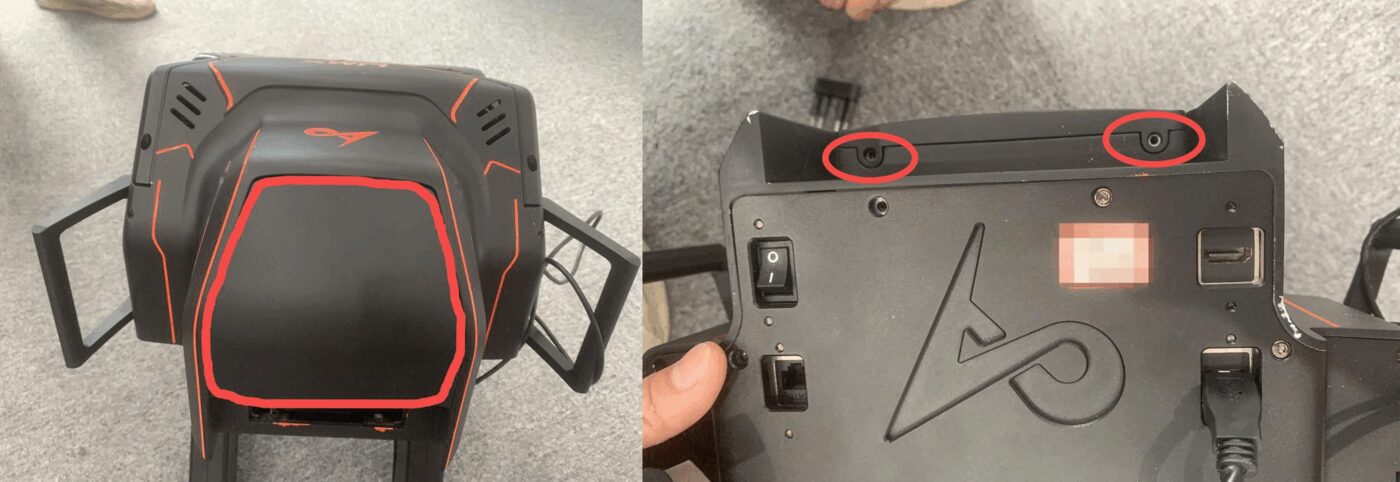
Remove the top cover
Unscrew the two screws holding the top cover of the P1 in place.
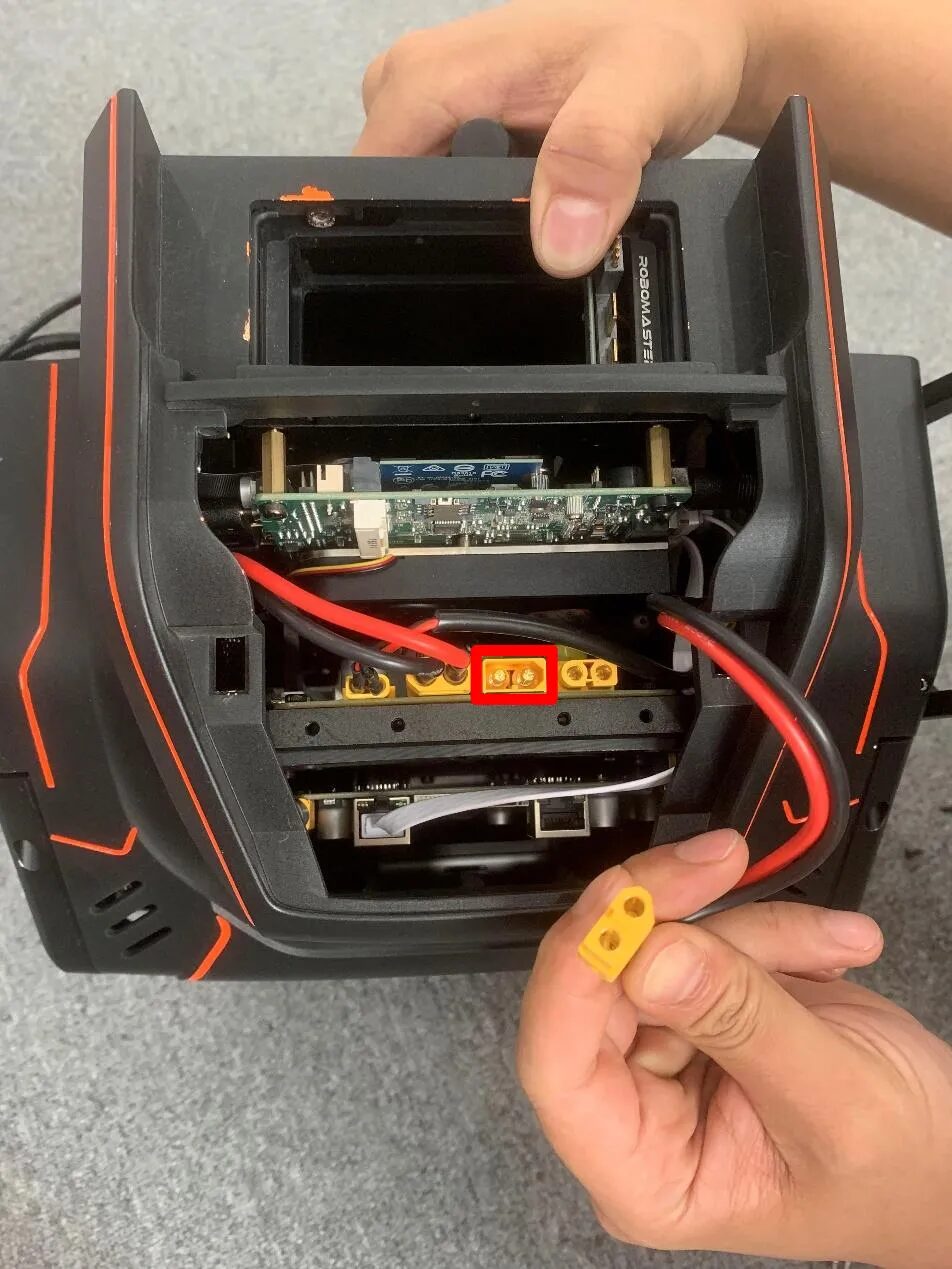
Locate the power ports
Once unscrewed, the power ports are visible — one of them is connected to the DJI battery.
Swap to external power
Unplug the DJI battery power port and connect the alternative 24V external power supply in its place.
Interfacing with the robot
Instructions for interfacing with the robot using Ubuntu 22.04 and ROS 2 Humble. The Ethernet port at the back of the P1 is used for setting up LAN communication.
Connect over LAN
- On your host PC (not the robot), in Ubuntu go to Settings → Network, click + and create a new connection.
- In the IPv4 settings, change the connection to Manual. Set Address to
10.192.1.200, Netmask24. - Save and restart your network. Check your host's local IP with
ifconfig. - Ping the robot:
ping 10.192.1.2 - Access it over SSH:
ssh -X limx@10.192.1.2(default password123123)
IP addresses
ROS 2 Humble on Ubuntu 22.04
The ROS driver is initially supported on ROS 2 Humble. All ROS-related software runs on a remote PC / Raspberry Pi / NVIDIA board — the P1 itself ships pre-installed with the required drivers and ROS distribution.

Standard ROS 2 Humble install
Ubuntu 22.04, apt repository + GPG key setup, locale configuration, ros-humble-desktop (or ros-humble-ros-base) install, environment sourcing and a talker/listener smoke test — the standard ROS 2 Humble walkthrough, unchanged from the official ROS docs.
ROS 2 Driver (Operation)
The P1's own docs mark this chapter as not yet published — check back, or ask us directly for the current state of the driver.
Care should be taken to match the ROS 2 install to your CPU architecture (armhf, amd64, arm64, etc.) — installing ROS 2 dependencies on a freshly-installed, un-upgraded Ubuntu 22.04 system can trigger removal of critical system packages. Full step-by-step command reference (~15 commands) and an FAQ placeholder (also not yet published upstream): MYBOTSHOP LimX P1 User Manual (PDF).
Manuals & documentation
Everything published for the P1 so far.
MYBOTSHOP LimX P1 User Manual
A single self-contained manual: power on/off, the full remote-control startup walkthrough, external power access, network/SSH setup, and the ROS 2 Humble install guide.
Download PDFNo LimX P1 robot-description (URDF) package is published yet — the linked repository on our side currently contains only a placeholder README. If you need one for RViz/MoveIt work, ask us directly.
If something goes wrong
Two steps, in order — the forum first for fast community and staff triage, then a direct ticket if it needs to go further.
MYBOTSHOP Forum
Open a topic on the MYBOTSHOP Forum describing your issue in detail — our support team and community members will attempt to resolve it remotely. For code-level bugs, GitHub Issues, StackOverflow and Answers-ROS are also in play.
Direct ticket & RMA
If the issue can't be resolved on the forum, email support@mybotshop.de with a detailed description and the troubleshooting steps already taken. We'll evaluate the case and, if necessary, issue an RMA number with return instructions — parcels sent without an RMA number are declined and returned to the sender.
RMA returns ship to: MYBOTSHOP GmbH, Willy-Messerschmitt-Strasse 12, 50126 Bergheim, Germany.
We're here for the whole deployment
A new use case, a question about the remote-control state machine, or ROS 2 driver access — the MYBOTSHOP team can help.
support@mybotshop.de