MMP DAR
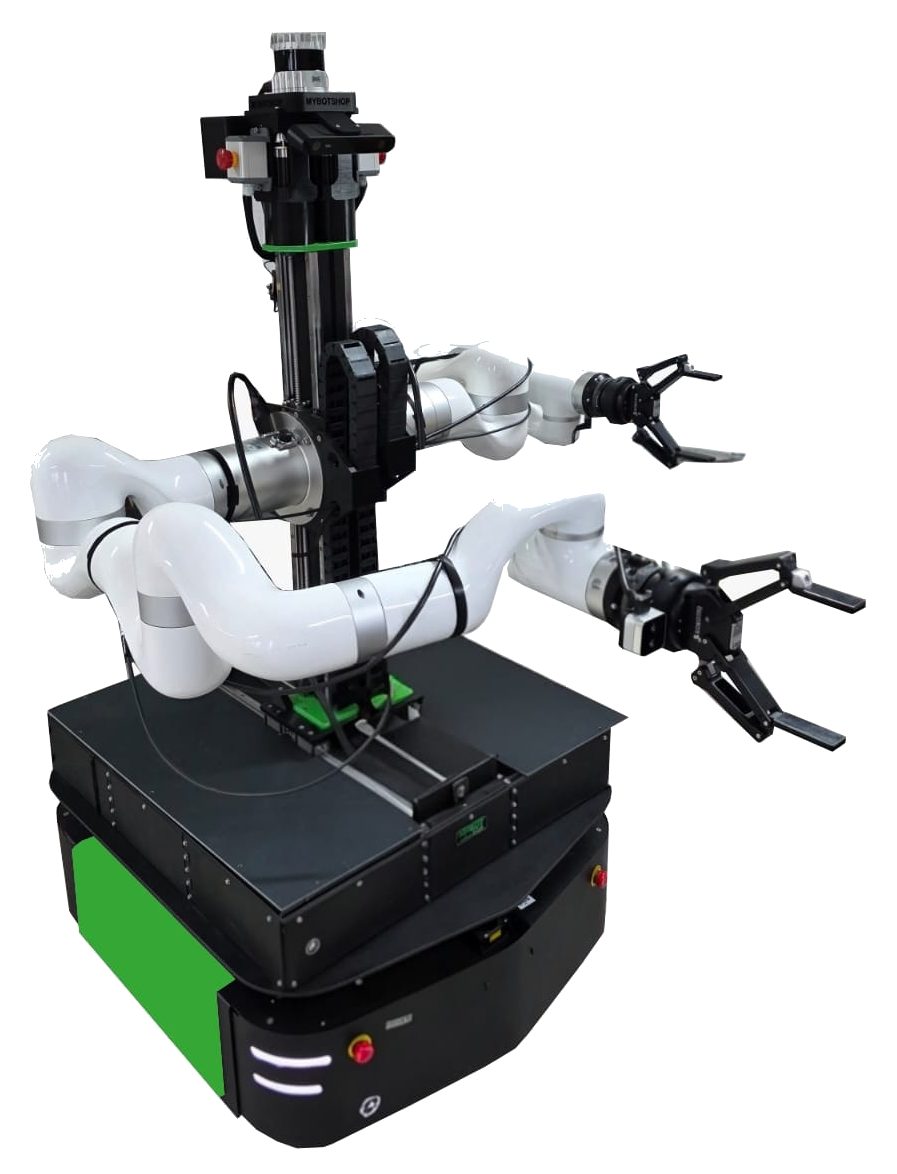
This specifies the configuration for Mobile Manipulation Platform (MMP) Dual ARM Ridgeback (DAR) version running ROS2 Jazzy. It features dual xARM850 manipulators with Robotiq 2F-140 grippers, a custom 3-axis rig system, Ouster 3D lidar, dual Hokuyo lidars, Intel RealSense and ZED2i cameras.
Important
Carefully review this document. If there are uncertainties, it is crucial to seek guidance from specialists, experts, or the manufacturers of the assemblies employed. The robot should not be activated until clarification is obtained. If any doubts persist, refer to the provided guides or get in touch with a specialist, expert, or the manufacturer of the assemblies used.
Warning
The robot supplied by MYBOTSHOP GmbH is intended for research and development purposes and does not bear the CE Marking and/or Certificate of Incorporation. A fundamental understanding of ROS2 (Robot Operating System 2) is necessary. If you lack familiarity with ROS2, we recommend consulting the ROS2 Documentation as a first step.
It is important to note that the mentioned robot is categorized as a partially completed machine according to the Machinery Directive 2006/42/EC and does not carry a CE marking.
Getting Started
For powering on and basic usage of the Ridgeback base, refer to the Clearpath Ridgeback documentation.

Data Sheets
Network Setup
Device |
Network Address |
Username |
Password |
|---|---|---|---|
R100 Computer |
192.168.131.1 |
robot |
mybotshop |
R100 MCU |
192.168.131.2 |
N/A |
N/A |
Webserver |
192.168.131.1:9000 |
admin |
mybotshop |
Cockpit |
192.168.131.1:9090 |
robot |
mybotshop |
Left xARM850 |
192.168.131.5:18333 |
N/A |
N/A |
Right xARM850 |
192.168.131.6:18333 |
N/A |
N/A |
Hokuyo Front |
192.168.131.21 |
N/A |
N/A |
Hokuyo Rear |
192.168.131.22 |
N/A |
N/A |
Ouster Lidar |
192.168.131.30 |
N/A |
N/A |
Router |
192.168.131.200 |
SSID |
mybotshop |
Quick Start ROS2
Power On
Release the emergency stop button by turning it clockwise.
Press the power button to turn on the robot.
Wait for the robot to boot up completely (approximately 1-2 minutes).
The Clearpath and MMP services will start automatically.
Verify the webserver is accessible at http://192.168.131.1:9000.
Power Off
Warning
Always follow the proper shutdown procedure to prevent data corruption and hardware damage.
Deactivate the rig system (if active):
ros2 service call /r100_0118/mmp_rig/activation \
  mmp_interface/srv/RigActivation \
  "{base_plate: false, left_plate: false, right_plate: false}"
Disable xARM850 arms via the web interface or stop the driver services:
sudo systemctl stop mmp-xarm-driver-left.service
sudo systemctl stop mmp-xarm-driver-right.service
Engage the emergency stop by pressing it down.
Disconnect battery from Arms by clicking the red button.
Shutdown the robot via SSH or Cockpit terminal:
sudo shutdown now
Turn off the main power switch on the back of the Ridgeback.
Network Connection
Connect to the robot’s WiFi network or via Ethernet.
The robot IP address is 192.168.131.1.
The WiFi password is mybotshop.
Access the webserver at 192.168.131.1:9000.
The webserver username is admin and password is mybotshop.
SSH Connection
ssh robot@192.168.131.1
Check Service Status
sudo systemctl status clearpath-robot.service
sudo systemctl status mmp-webserver.service
Teleoperation
Teleoperate using the keyboard teleop package:
ros2 run teleop_twist_keyboard teleop_twist_keyboard \
  --ros-args --remap cmd_vel:=/r100_0118/cmd_vel \
  --ros-args -p stamped:=true
Note
Replace r100_0118 with your robot’s namespace. Reduce speed by pressing z until 0.1 for safe indoor operation.
Visualization
View the robot state in RViz2:
ros2 launch mmp_viz view_robot.launch.py
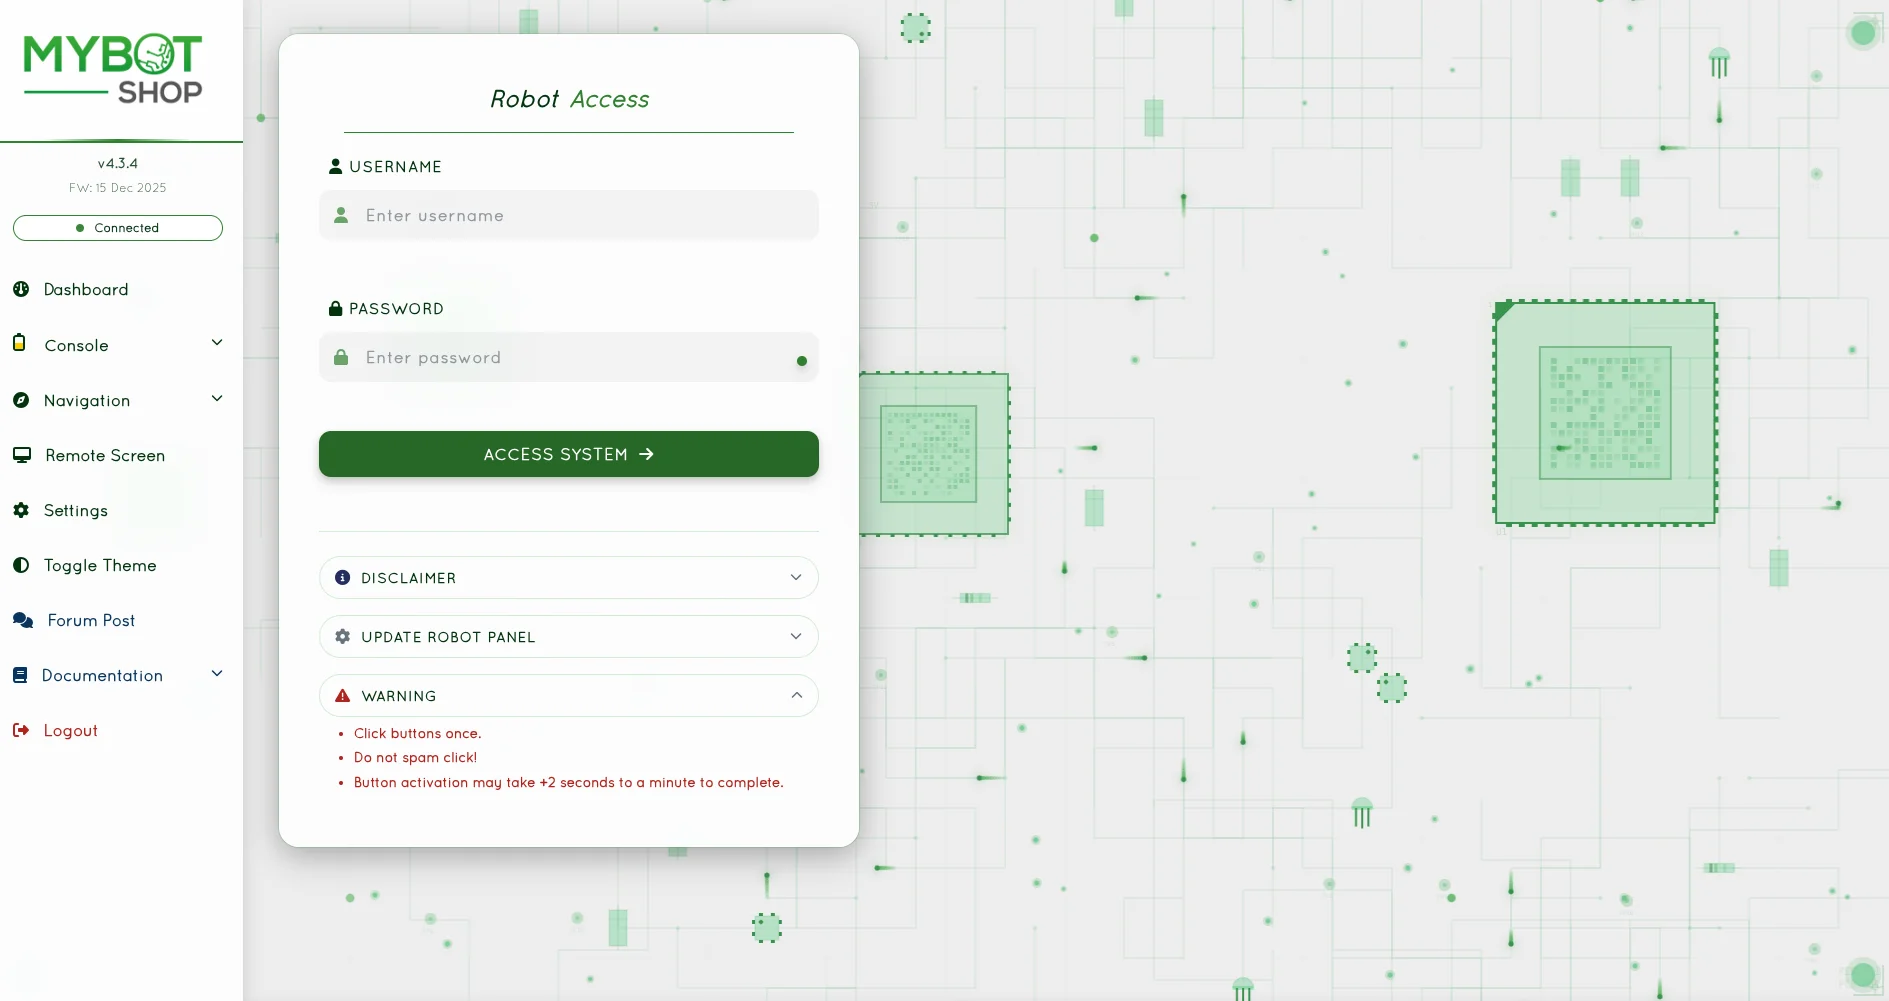
Webserver
The webserver module comes pre-installed and should be accessible directly at http://192.168.131.1:9000/ or via the WiFi IP to which the robot is connected.
Login
Username: admin
Password: mybotshop
Dashboard
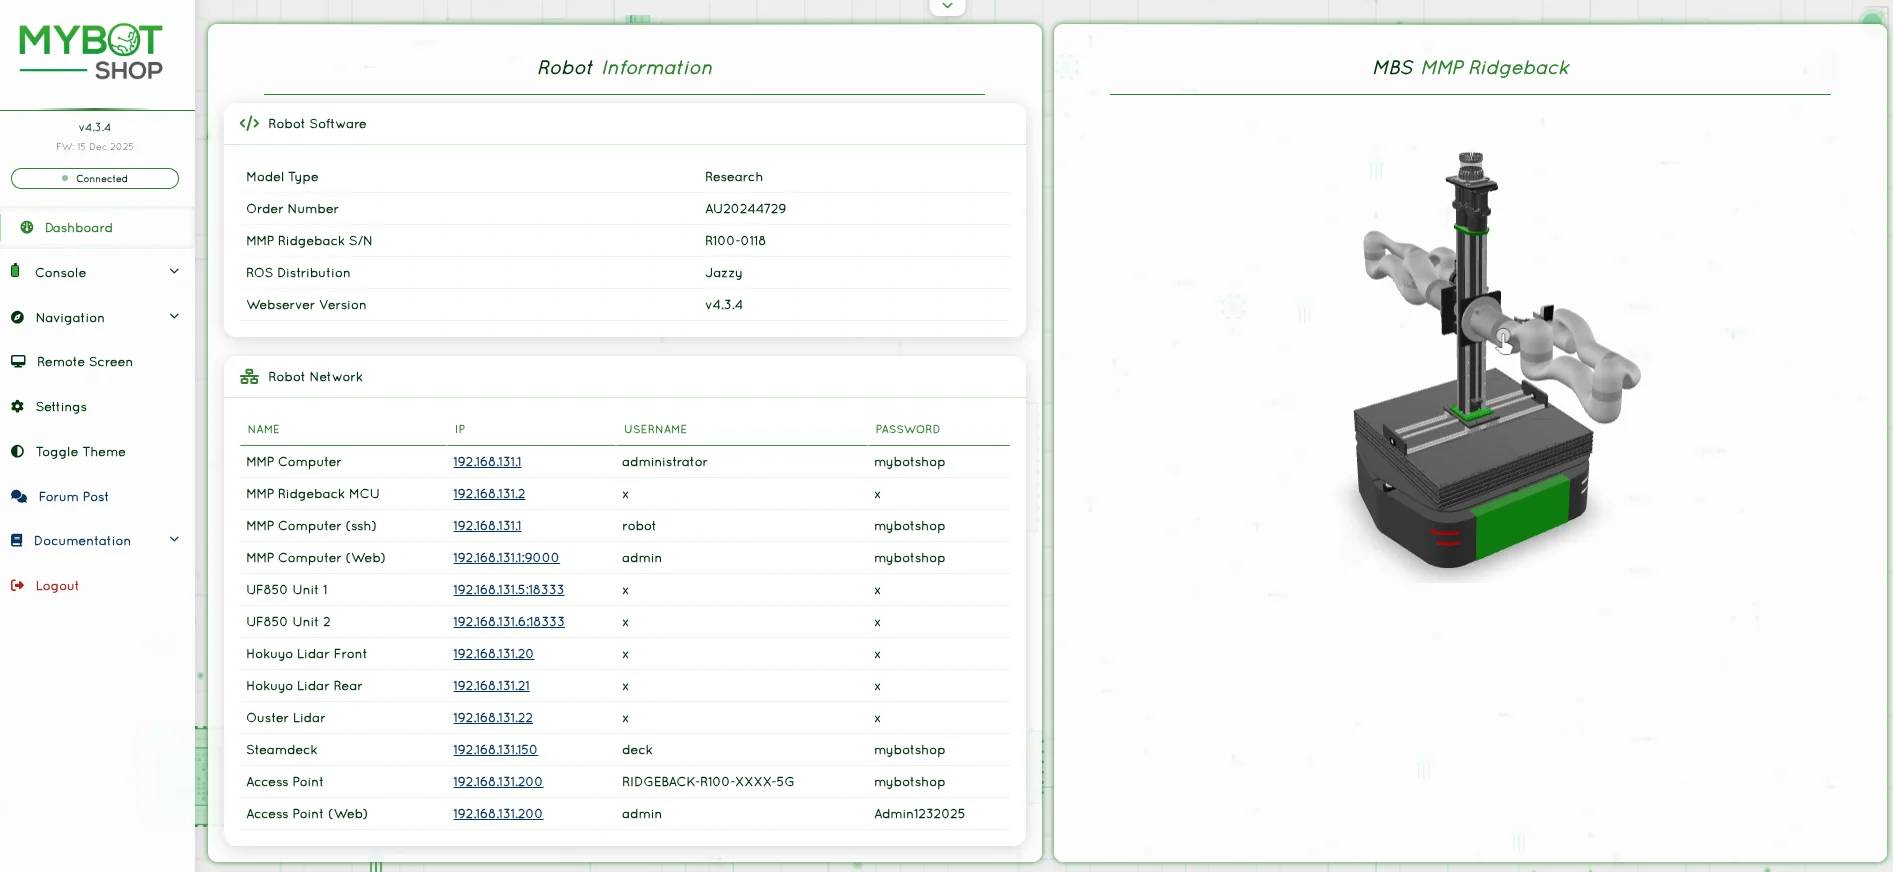
View IP Address of the R100
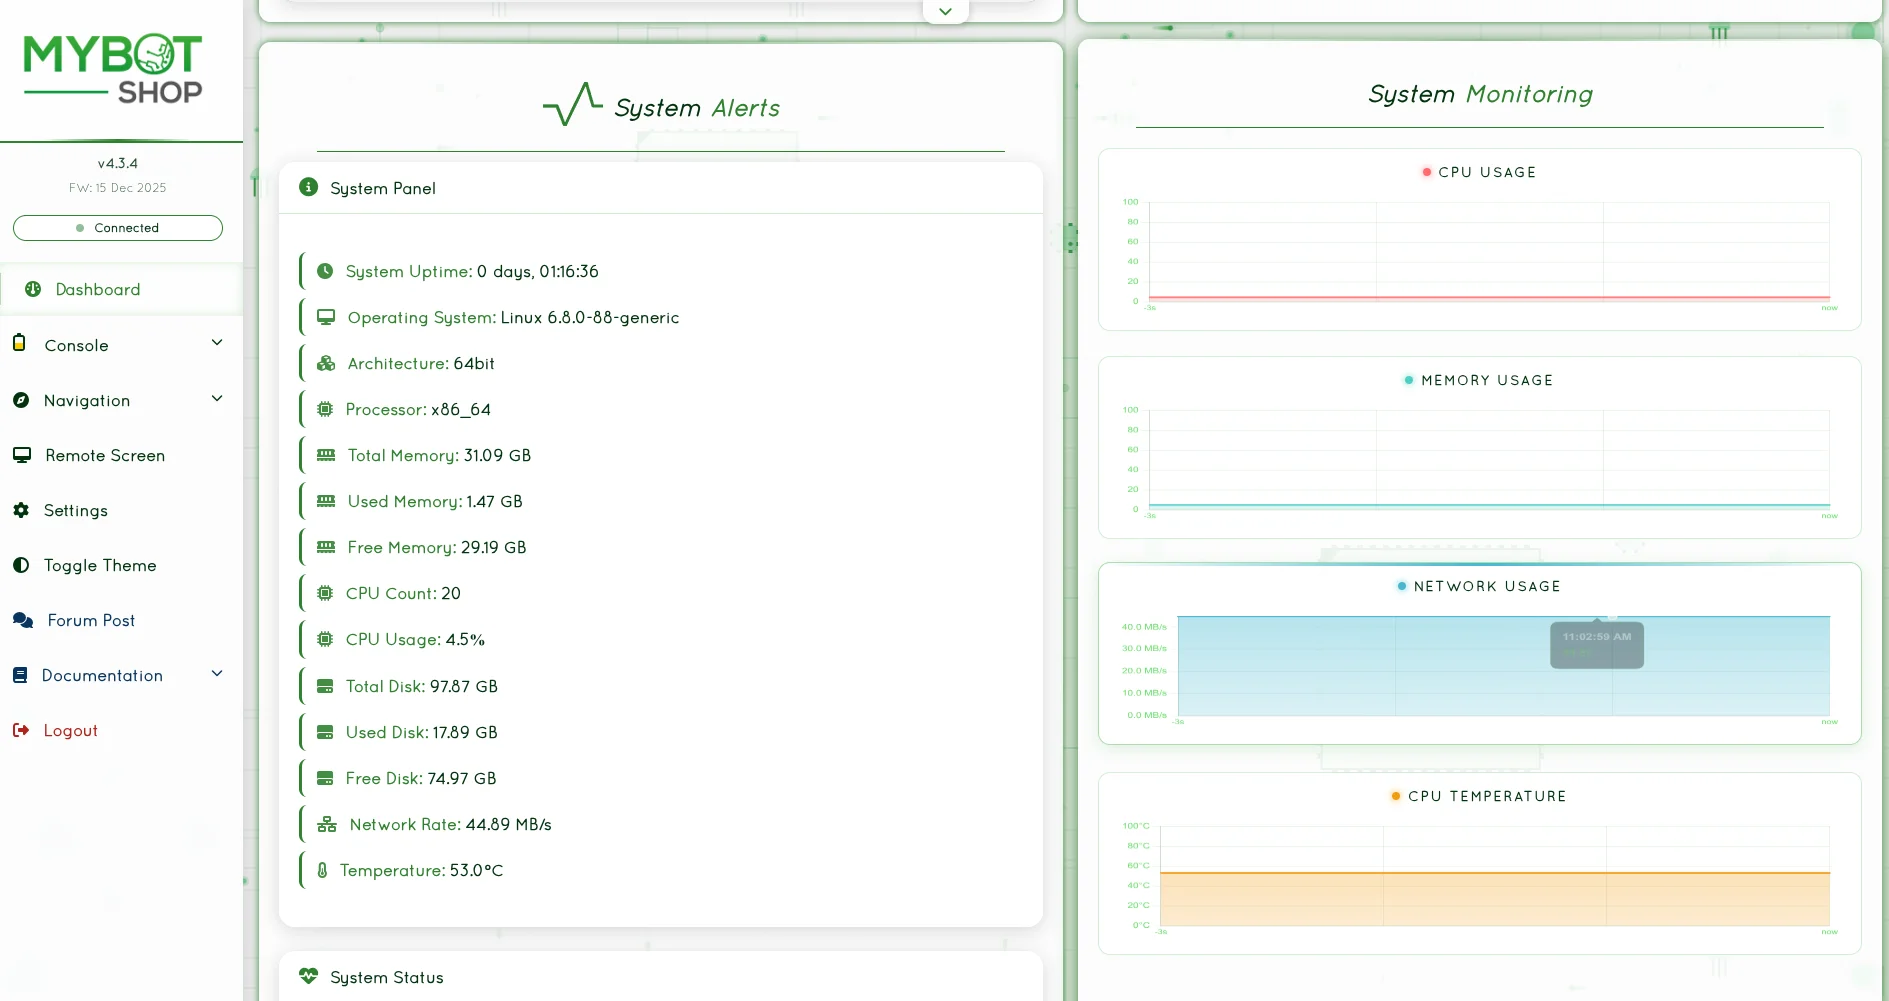
View System load
Console
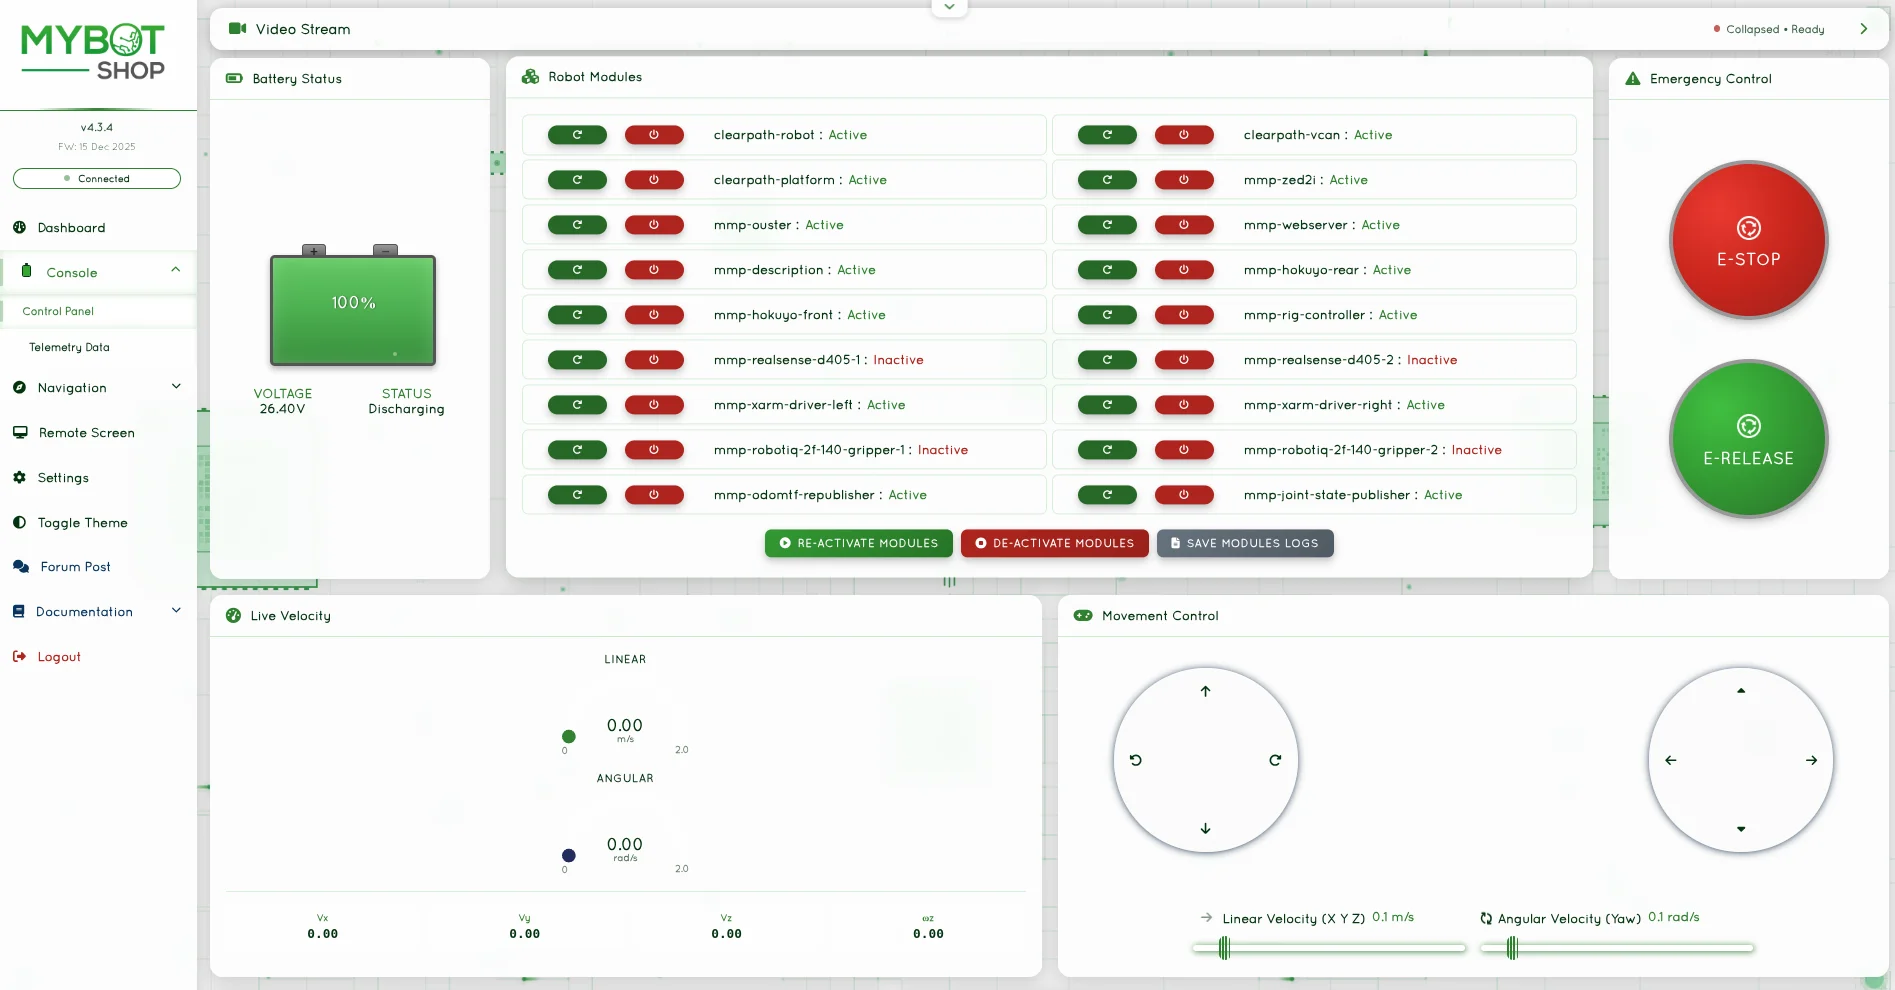
Enable/Disable the R100 ROS2 Services
Record System logs
Battery status monitoring
Pre-configured action buttons (adaptable to new ROS2 services)
Web Joystick for teleoperation
Online image stream
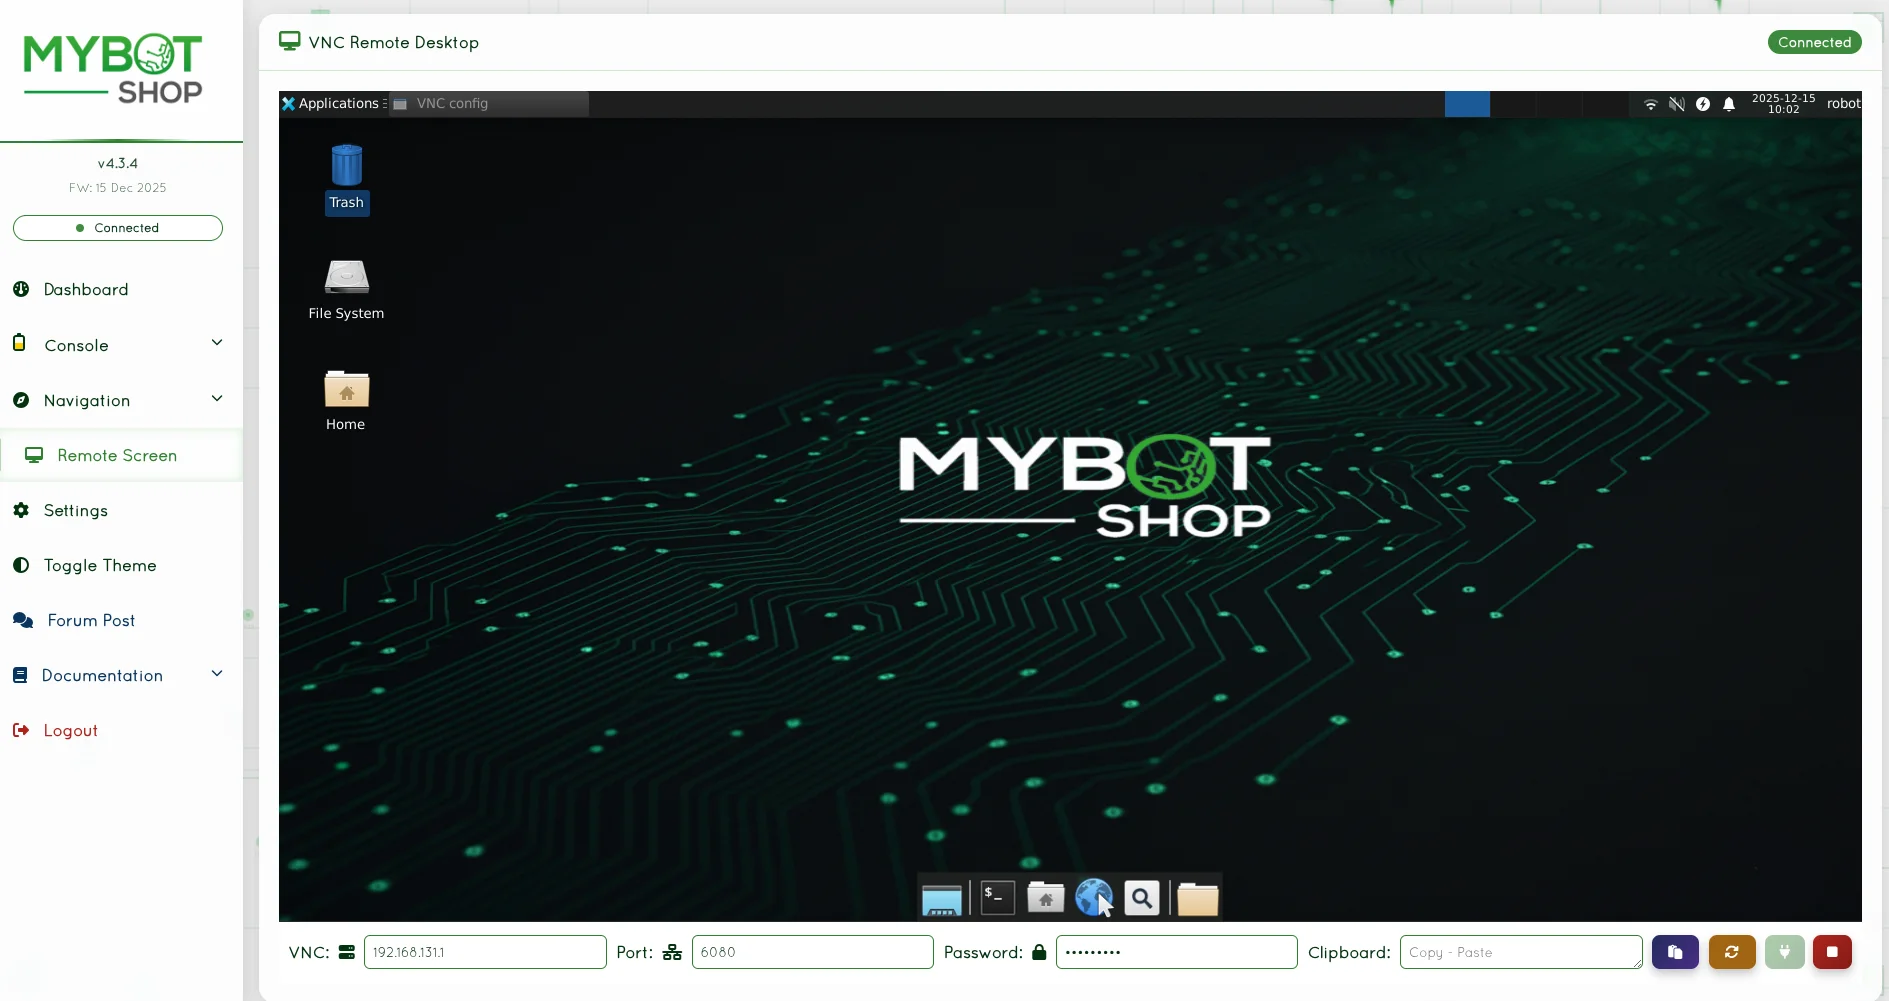
Remote Desktop (VNC)
Access on-board screen of the R100’s computer:
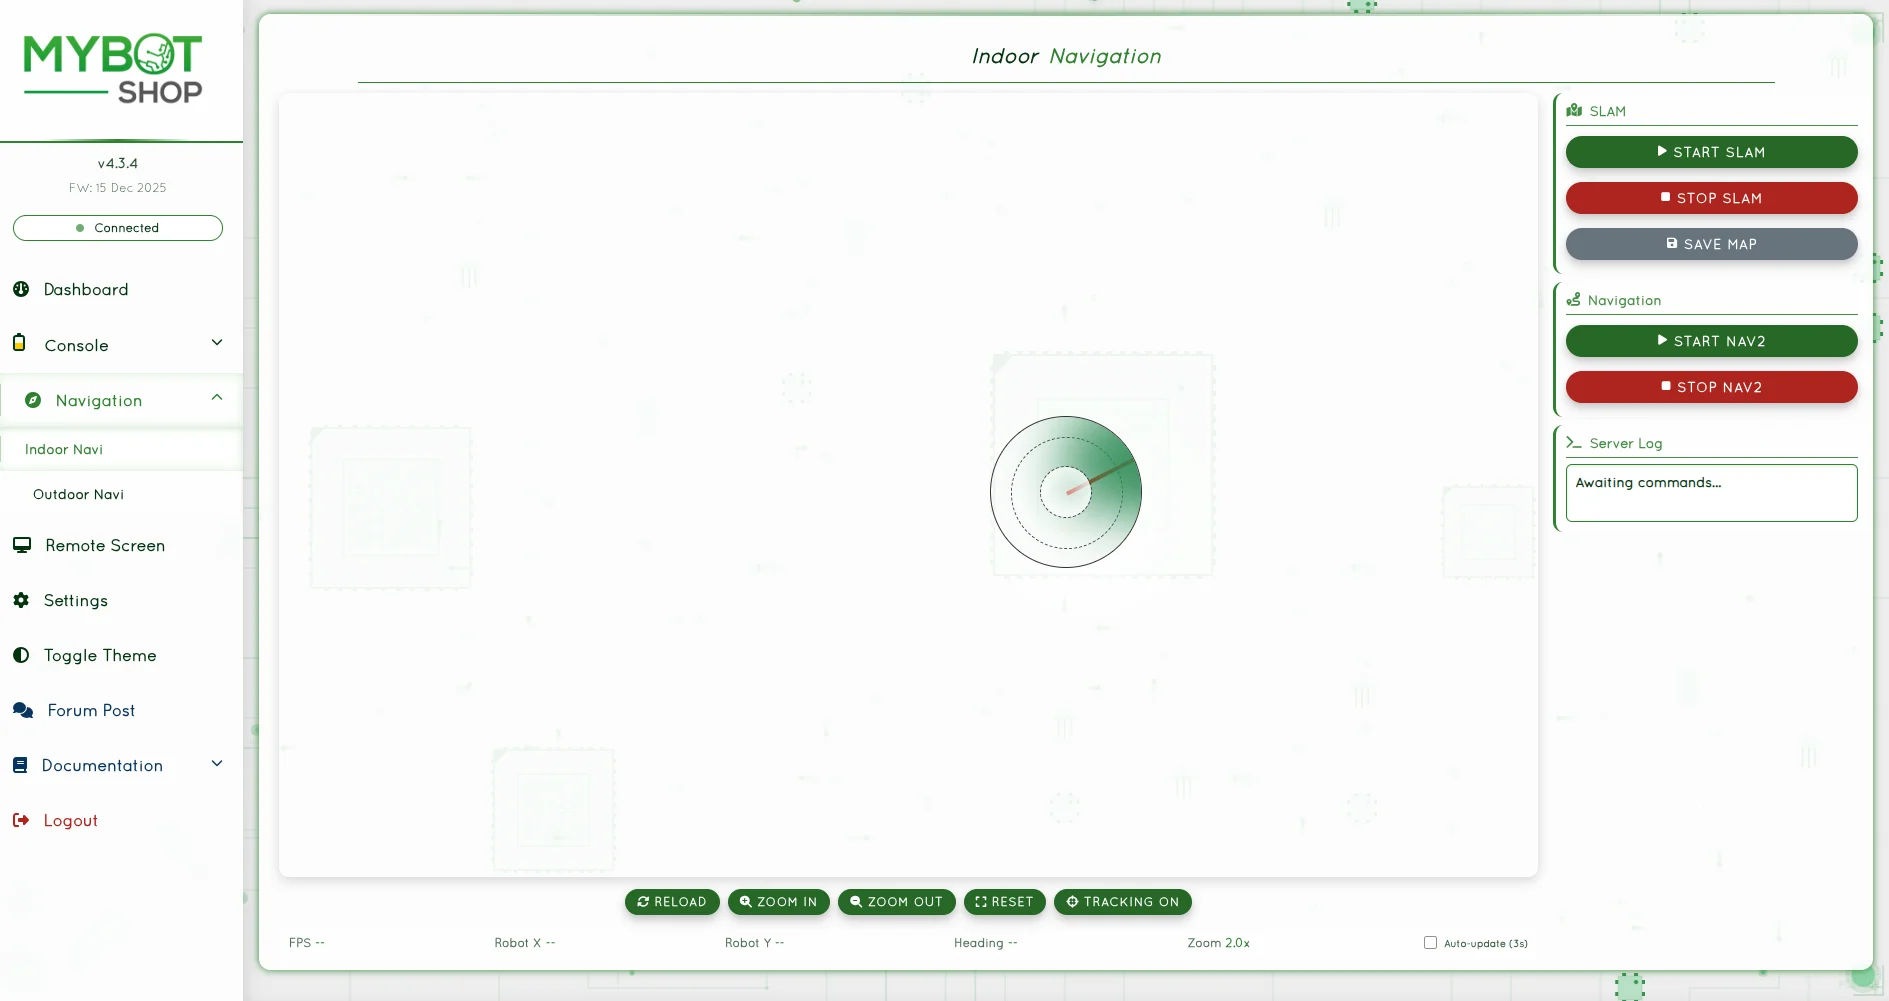
Navigation Indoor
Map visualization and navigation control:
ROS2 Package Reference
Workspace Structure
The MMP R100 workspace is organized into two main categories: mybotshop (custom MBS packages) and third_party (external dependencies).
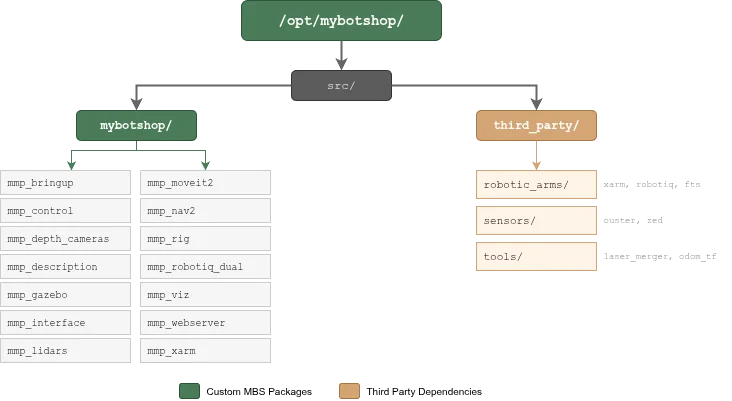
mybotshop Packages
Package |
Description |
|---|---|
mmp_bringup |
System startup and service management |
mmp_control |
Base and manipulator controllers |
mmp_depth_cameras |
RealSense and ZED camera drivers |
mmp_description |
URDF/Xacro robot models |
mmp_dual_uf850_moveit2 |
Dual arm MoveIt2 configuration |
mmp_gazebo |
Gazebo Fortress simulation |
mmp_interface |
Custom messages and services |
mmp_lidars |
Hokuyo and Ouster LiDAR drivers |
mmp_nav2 |
Nav2 navigation stack configuration |
mmp_rig |
3-axis linear actuator control |
mmp_robotiq_dual |
Dual Robotiq 2F-140 gripper control |
mmp_viz |
RViz2 visualization configurations |
mmp_webserver |
Web dashboard and remote control |
mmp_xarm |
Dual xARM850 driver configuration |
third_party Dependencies
Category |
Package |
Description |
|---|---|---|
robotic_arms |
xarm_ros2 |
UFactory xArm drivers |
robotic_arms |
robotiq_gripper_ros2 |
Robotiq gripper drivers |
robotic_arms |
rq_fts_ros2 |
Robotiq FT sensor drivers |
sensors |
ouster-ros |
Ouster OS1 LiDAR driver |
sensors |
zed_ros2 |
Stereolabs ZED2i driver |
tools |
ros2_laser_scan_merger |
Multi-LiDAR scan fusion |
tools |
odom_to_tf_ros2 |
Odometry to TF publisher |
Emergency Stop (E-Stop)
Warning
The Emergency Stop (E-Stop) is a critical safety mechanism. When activated, it immediately halts all motion on ALL connected systems.
E-Stop Connected Systems
The E-Stop circuit is connected to and controls the following systems:
System |
Description |
|---|---|
Ridgeback Mobile Base |
Clearpath Ridgeback omnidirectional platform (disables wheels) |
Rig System - Base Plate |
Horizontal translation (Forward/Rear, 0-400mm range) |
Rig System - Left Plate |
Vertical lift for left arm (Up/Down, 0-500mm range) |
Rig System - Right Plate |
Vertical lift for right arm (Up/Down, 0-500mm range) |
Left xARM850 |
6-DOF robotic arm with Robotiq 2F-140 gripper |
Right xARM850 |
6-DOF robotic arm with Robotiq 2F-140 gripper |
E-Stop Behavior
When E-Stop is ENGAGED (pressed):
All motors on the Ridgeback cease operation immediately
All three rig axes stop and hold position (brakes engage)
Both xARM850 arms enter emergency stop state (servos disabled)
All motion commands are ignored until E-Stop is released
When E-Stop is RELEASED:
Important
Systems do NOT automatically resume operation after E-Stop release.
Each system must be re-enabled manually:
Ridgeback: Automatically recovers when E-Stop is released
Rig System: Re-activate via service call:
ros2 service call /r100_0118/mmp_rig/activation \
  mmp_interface/srv/RigActivation \
  "{base_plate: true, left_plate: true, right_plate: true}"
xARM850 Arms: Re-enable via xARM web interface or driver restart
Warning
If xARM850 arms fail to start after E-Stop release and you cannot hear clicking sounds, engage E-Stop again, wait 5 seconds, release, and retry enabling the arms.
Dual xARM850 Startup
Ensure the robot arms are receiving power (flip the 50A lever towards its black counterpart).
To enable, go to console in Dashboard (http://192.168.131.1:9000) and activate the xARM driver services.
If the xARM850 doesn’t start and you can’t hear clicking sound, engage the emergency stop and release it after 5 seconds. Then try again either with the driver or their web interface at:
Left arm: http://192.168.131.5:18333
Right arm: http://192.168.131.6:18333
Rig Control
The 3-axis rig system provides positioning for the dual manipulator arms.
Rig Position Ranges
Axis |
Min |
Max |
Direction |
|---|---|---|---|
Base Plate |
0 |
400 |
0=Front, 400=Rear |
Left Plate |
0 |
500 |
0=Down, 500=Up |
Right Plate |
0 |
500 |
0=Down, 500=Up |
Activation
# Activate rig system
ros2 service call /r100_0118/mmp_rig/activation \
  mmp_interface/srv/RigActivation \
  "{base_plate: true, left_plate: true, right_plate: true}"

# Deactivate rig system (recommended when not in use)
ros2 service call /r100_0118/mmp_rig/activation \
  mmp_interface/srv/RigActivation \
  "{base_plate: false, left_plate: false, right_plate: false}"
Position Control
Warning
Ensure arms are not in collision path before moving rig!
# Move to middle + mid position
ros2 service call /r100_0118/mmp_rig/control \
  mmp_interface/srv/RigControl \
  "{base_plate: 200.0, left_plate: 250.0, right_plate: 250.0}"

# Move to rear + highest position
ros2 service call /r100_0118/mmp_rig/control \
  mmp_interface/srv/RigControl \
  "{base_plate: 400.0, left_plate: 500.0, right_plate: 500.0}"

# Move to front + lowest position
ros2 service call /r100_0118/mmp_rig/control \
  mmp_interface/srv/RigControl \
  "{base_plate: 0.0, left_plate: 0.0, right_plate: 0.0}"
Velocity Control
For simple velocity-based movement:
# Stop all axes
ros2 topic pub /r100_0118/mmp_rig/cmd_vel \
  mmp_interface/msg/RigControlCmd \
  "{base_plate: 0, left_plate: 0, right_plate: 0}"

# Move base plate forward
ros2 topic pub /r100_0118/mmp_rig/cmd_vel \
  mmp_interface/msg/RigControlCmd \
  "{base_plate: 1, left_plate: 0, right_plate: 0}"
Dual xARM850 Control
Key Launch Files
custom_dualarm_drivers.launch.py- Launch both arms with custom configurationinclude/xarm850_unit_1.launch.py- Left arm onlyinclude/xarm850_unit_2.launch.py- Right arm only
Configuration
Left arm IP: 192.168.131.5 (Web interface: http://192.168.131.5:18333)
Right arm IP: 192.168.131.6 (Web interface: http://192.168.131.6:18333)
MoveIt2 Configuration
MoveIt2 configuration for dual UF850 (xARM850) manipulator motion planning. Provides motion planning, collision avoidance, and coordinated dual-arm control.
Planning Groups:
left_arm- Left xARM850 planning groupright_arm- Right xARM850 planning groupdual_arm- Coordinated dual-arm planning
Usage:
# Launch dual arm MoveIt
ros2 launch mmp_dual_uf850_moveit2 mbs_dual_arm.launch.py

# Launch visualizer
ros2 launch mmp_viz view_dualarm.launch.py
Note
Configure planner with OMPL -> TRRT (default). Ensure to see trails of planned path before execution.
Test xARM Trajectory
# Make Left Robot Arm Stand
ros2 action send_goal /r100_0118_uf1/uf850_ufactory_unit01_traj_controller/follow_joint_trajectory \
  control_msgs/action/FollowJointTrajectory "{
  trajectory: {
    joint_names: [uf_left_joint1, uf_left_joint2,
      uf_left_joint3, uf_left_joint4,
      uf_left_joint5, uf_left_joint6],
    points: [{
      positions: [-0.003, 0.424, -0.907,
        -0.005, 0.241, 0.1],
      time_from_start: {sec: 5, nanosec: 0}
    }]
  }
}"

# Make Right Robot Arm Stand
ros2 action send_goal /r100_0118_uf2/uf850_ufactory_unit02_traj_controller/follow_joint_trajectory \
  control_msgs/action/FollowJointTrajectory "{
  trajectory: {
    joint_names: [uf_right_joint1, uf_right_joint2,
      uf_right_joint3, uf_right_joint4,
      uf_right_joint5, uf_right_joint6],
    points: [{
      positions: [-0.003, 0.424, -0.907,
        -0.005, 0.241, 0.1],
      time_from_start: {sec: 5, nanosec: 0}
    }]
  }
}"
Dual Gripper Control
Dual Robotiq 2F-140 gripper control via xArm RS485 tool port.
Key Launch Files
gripper_left.launch.py- Left gripper controllergripper_right.launch.py- Right gripper controller
Services
/r100_0118/gripper/left/open- Open left gripper/r100_0118/gripper/left/close- Close left gripper/r100_0118/gripper/left/set_position- Set left gripper position/r100_0118/gripper/left/reset- Reset left gripper(Same services available for right gripper)
Usage
# Launch gripper controllers
ros2 launch mmp_robotiq_dual gripper_left.launch.py
ros2 launch mmp_robotiq_dual gripper_right.launch.py

# Open/Close grippers via service
ros2 service call /r100_0118/gripper/left/open std_srvs/srv/Trigger
ros2 service call /r100_0118/gripper/left/close std_srvs/srv/Trigger

# Set gripper position (0=open, 255=closed)
ros2 service call /r100_0118/gripper/left/set_position \
  mmp_interface/srv/GripperCommand \
  "{position: 128, speed: 255, force: 100}"

# Reset gripper (use when gripper stops responding)
ros2 service call /r100_0118/gripper/left/reset std_srvs/srv/Trigger
MoveIt Action Interface
Position in radians: 0.0=open, 0.7=closed
# Open gripper fully (0.0 rad)
ros2 action send_goal \
  /r100_0118/left_gripper_controller/gripper_cmd \
  control_msgs/action/GripperCommand \
  "{command: {position: 0.0, max_effort: 50.0}}"

# Close gripper fully (0.7 rad)
ros2 action send_goal \
  /r100_0118/left_gripper_controller/gripper_cmd \
  control_msgs/action/GripperCommand \
  "{command: {position: 0.7, max_effort: 50.0}}"
Note
MoveIt sends position as joint angle in radians (matching URDF finger joint limits 0-0.7 rad).
Monitor Gripper Joint States
ros2 topic echo /r100_0118/robotiq_2f_140/left/joint_states
ros2 topic echo /r100_0118/robotiq_2f_140/right/joint_states
LiDAR Sensors
Key Launch Files
combined_scan.launch.py- Merges multiple LiDAR scansinclude/hokuyo_f.launch.py- Front Hokuyo UST-20LXinclude/hokuyo_r.launch.py- Rear Hokuyo UST-20LXinclude/ouster.launch.py- Ouster OS1 3D LiDAR
IP Configuration
Sensor |
IP Address |
|---|---|
Hokuyo Front |
192.168.131.21 |
Hokuyo Rear |
192.168.131.22 |
Ouster |
192.168.131.30 |
Depth Cameras
Key Launch Files
realsense_i.launch.py- First RealSense camera (D405)realsense_ii.launch.py- Second RealSense camera (D455)zed.launch.py- ZED2i stereo camera
Note
Running Ouster and RealSense simultaneously may cause camera latency due to high bandwidth usage. Consider using one or the other for optimal performance.
Simulation
The R100 simulation package uses ROS2 Jazzy with Gazebo Fortress, featuring the complete MMP platform with dual xArm850 arms, Robotiq grippers, FT300 sensors, and adjustable rig on a Clearpath Ridgeback base.
Prerequisites
ROS 2 Jazzy
Gazebo Fortress
gz_ros2_control
Clearpath robot packages
Launch Simulation
export ROS_LOCALHOST_ONLY=1
source /opt/ros/jazzy/setup.bash
source /opt/mybotshop/install/setup.bash
ros2 launch mmp_gazebo simulation.launch.py
To kill Gazebo zombie processes:
ros2 run mmp_gazebo kill_gz.sh
Environment Variables
Configure the simulation using environment variables before launch:
Variable |
Default |
Description |
|---|---|---|
MMP_RIDGEBACK_GAZEBO |
1 |
Enable Gazebo simulation mode |
MMP_RIDGEBACK_RIG |
1 |
Include rig (tower + brackets) |
MMP_RIG_PLATE_JOINTS |
1 |
Enable rig joint control |
MMP_RIDGEBACK_XARM850 |
1 |
Include dual xArm850 arms |
MMP_RIDGEBACK_OUSTER |
0 |
Include Ouster lidar |
MMP_RIDGEBACK_ZED |
0 |
Include ZED2i camera |
MMP_RIDGEBACK_FT |
1 |
Include Robotiq FT300 sensors |
MMP_RIDGEBACK_GRIPPER |
1 |
Include Robotiq 2F-140 grippers |
MMP_RIDGEBACK_GRIPPER_D405 |
0 |
Include Intel D405 cameras |
Available Controllers
Controller |
Description |
|---|---|
joint_state_broadcaster |
Publishes joint states |
platform_velocity_controller |
Base movement (4 wheels) |
uf_left_arm_controller |
Left xArm850 (6 joints) |
uf_right_arm_controller |
Right xArm850 (6 joints) |
rig_position_controller |
Tower + brackets (3 joints) |
uf_left_gripper_controller |
Left Robotiq 2F-140 |
uf_right_gripper_controller |
Right Robotiq 2F-140 |
Check controllers:
ros2 control list_controllers -c /r100_0118/controller_manager
RViz2 Visualization
ros2 launch mmp_viz view_robot.launch.py
Teleoperation (Keyboard)
ros2 run teleop_twist_keyboard teleop_twist_keyboard \
  --ros-args --remap cmd_vel:=/r100_0118/cmd_vel \
  --ros-args -p stamped:=true
Move Arms in Simulation
# Move left arm
ros2 action send_goal \
  /r100_0118/uf_left_arm_controller/follow_joint_trajectory \
  control_msgs/action/FollowJointTrajectory "{
  trajectory: {
    joint_names: [uf_left_joint1, uf_left_joint2,
      uf_left_joint3, uf_left_joint4,
      uf_left_joint5, uf_left_joint6],
    points: [{
      positions: [-1.57, 1.57, 0.0, 0.5, 0.0, 0.0],
      time_from_start: {sec: 2}
    }]
  }
}"
Move Rig in Simulation
# Raise tower and extend brackets
ros2 action send_goal \
  /r100_0118/rig_position_controller/follow_joint_trajectory \
  control_msgs/action/FollowJointTrajectory "{
  trajectory: {
    joint_names: [ridgeback_tower_xarm850_joint,
      ridgeback_xarm850_bracket_left_joint,
      ridgeback_xarm850_bracket_right_joint],
    points: [{
      positions: [0.2, 0.3, 0.3],
      time_from_start: {sec: 2}
    }]
  }
}"
Control Grippers in Simulation
# Open left gripper (0.0 = open)
ros2 action send_goal \
  /r100_0118/uf_left_gripper_controller/gripper_cmd \
  control_msgs/action/GripperCommand \
  "{command: {position: 0.0, max_effort: 100.0}}"

# Close left gripper (0.695 = closed)
ros2 action send_goal \
  /r100_0118/uf_left_gripper_controller/gripper_cmd \
  control_msgs/action/GripperCommand \
  "{command: {position: 0.695, max_effort: 100.0}}"
Installation
ROS2 Jazzy Fresh Installation
Install ROS Jazzy and Clearpath packages:
sudo apt-get install ros-jazzy-clearpath-* -y
sudo apt update && sudo apt upgrade
Run the Clearpath computer installer script:
cd mbs_ridgeback/src/mybotshop/mmp_bringup/scripts
bash clearpath_computer_installer.sh
Add R100 Ridgeback when prompted.
Start the Clearpath service:
sudo systemctl daemon-reload
sudo systemctl start clearpath-robot.service
Create the mybotshop workspace directory:
sudo mkdir /opt/mybotshop
sudo chown -R robot:robot /opt/mybotshop
sudo chown -R robot:robot /etc/clearpath
Copy the workspace to
/opt/mybotshop/and run the dependency installer:
cd /opt/mybotshop/src
./ros2_dependencies
Build the workspace:
cd /opt/mybotshop
colcon build --symlink-install \
  --cmake-args -DCMAKE_BUILD_TYPE=Release
source install/setup.bash
Install custom sensor services:
ros2 run mmp_bringup startup_installer.py
Disable system suspend:
sudo systemctl mask sleep.target suspend.target \
  hibernate.target hybrid-sleep.target
Sync Host Computer to Robot
To sync your development workspace to the robot:
rsync -avP -t --delete -e ssh src \
  administrator@192.168.131.1://opt/mybotshop
Caution
Always remain close to the emergency stop buttons.
Power off the robot correctly via the proper shutdown procedure.
Sudden jerks to the mobile robot can cause a disconnection. The velocity provided should always be smooth.
Ensure arms are not in collision path before moving the rig system.
Known Issues
xARM850 not starting:
If the xARM850 doesn’t start and you can’t hear clicking sounds, engage the emergency stop and release it after 5 seconds. Then try again.
Camera latency:
Running Ouster and RealSense simultaneously may cause latency. Consider using one or the other for optimal performance.
Safety Guidelines
For comprehensive safety guidelines regarding robotic manipulators and autonomous mobile robots, please refer to the Robotic Manipulator Safety section.